Terraform modules - keep it DRY !
Introduction
One of the reasons Infrastructure as Code has become so popular is because of its capacity to deploy ressources repeatedly with consistent and predictable outcome. A very common use case in Azure, is to have different subscription per environment. Thus you can provision identical Infrastructure for your applications between Production, Staging and Development, which is invaluable for your deployment.
Your working directory, made of tf and tfvars, in which you will invoke terraform plan forms your ROOT MODULE. But you can also create re-usable modules that will allow you to template composite cloud resources.
Such module is usually build around 3 tf files (and a readme + licence file) :
- variables.tf : to define your input variables and default value if needed
- outputs.tf : to reference attributes from the resources delared in your module
- main.tf : where you write your code to provision your resources
Resources dependencies in the Cloud
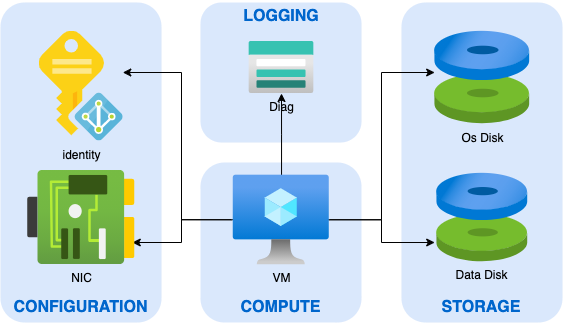
What I call composite cloud resources, are resources composed of multiple smaller resources. A good example of such resources are VMs. In the diagram below, you can see the usual components of an Azure Virtual machines.
If you declare such VM in your ROOT MODULE, you would have to write something like this in your main.tf :
locals {
  vm = "myVM"
}

# source data for keyvault
data "azurerm_key_vault" "kv" {
  name                = "mykeyvault"
  resource_group_name = "rgKeyVault"
}

# source data for subnet
data "azurerm_subnet" "subnet" {
  name                 = "mySubnet"
  virtual_network_name = "myVnet"
  resource_group_name  = "rgNetwork"
}

# Create Password for vm
resource "random_password" "password" {
  length = 16
  special = true
  min_lower = 1
  min_numeric = 1
  min_special = 1
  min_upper = 1
  override_special = "!@#$%"
}

# save password in keyvault secret
resource "azurerm_key_vault_secret" "secret" {
  name         = "${local.vm}-localadm"
  value        = random_password.password.result
  key_vault_id = data.azurerm_key_vault.kv.id
  lifecycle {
    ignore_changes = [
      value
    ]
  }
}

# Create Resource Group for VM
resource "azurerm_resource_group" "rg" {
  name = "myRg"
  location = "westeurope"
}

# Create storage account for each VM Diag
resource azurerm_storage_account "diag" {
  name  =  "${local.vm}diag"
  resource_group_name = azurerm_resource_group.rg.name
  location = azurerm_resource_group.rg.location
  account_tier = "Standard"
  account_replication_type = "LRS"
}

# Create NIC
resource "azurerm_network_interface" "nic" {
  name                = "${local.vm}-nic0"
  resource_group_name = azurerm_resource_group.rg.name
  location = azurerm_resource_group.rg.location

  ip_configuration {
    name                          = "internal"
    subnet_id                     = data.azurerm_subnet.subnet.id
    private_ip_address_allocation = "Dynamic"
  }
}

# Create VM
resource "azurerm_linux_virtual_machine" "vm" {
  name                = local.vm
  computer_name       = local.vm
  resource_group_name = azurerm_resource_group.rg.name
  location = azurerm_resource_group.rg.location
  size                = "Standard_B1ms"
  admin_username      = "localadm"
  admin_password      = random_password.password.result
  disable_password_authentication = "false"

  network_interface_ids = [
    azurerm_network_interface.nic.id,
  ]

  boot_diagnostics {
    storage_account_uri  = azurerm_storage_account.diag.primary_blob_endpoint
  }

  os_disk {
    name                 = "${local.vm}-OsDisk"
    caching              = "ReadWrite"
    storage_account_type = "Standard_LRS"
    disk_size_gb         = "64"
  }

  source_image_reference {
    publisher = "Canonical"
    offer     = "UbuntuServer"
    sku       = "18.04-LTS"
    version   = "latest"
  }

}

resource "azurerm_virtual_machine_extension" "azureadAuth" {
  name                 = "AADloginForLinux"
  virtual_machine_id   = azurerm_linux_virtual_machine.vm.id
  publisher            = "Microsoft.Azure.ActiveDirectory.LinuxSSH"
  type                 = "AADLoginForLinux"
  type_handler_version = "1.0"
}
Do Not Reapeat Yourself (DRY)
Obvisously, there is no benefit in copy/pasting all these lines changing only static values, to deploy more VMs. Enter modules! You can substitute all values by variables in the previous configuration, making more or less a template out of it. You can find an example here : Linux VM with Av Zone
To call the module linked above all you need to do is :
- declare the module
- indicate the source path
- initialize variables
You will also need a few resouces readily available before using it, such as a Keyvault, a Vnet with a Subnet, and a Storage Account.
# source data for an existing keyvault
data "azurerm_key_vault" "kv" {
  name                = "mykeyvault"
  resource_group_name = "rgKeyVault"
}

# source data for an existing subnet
data "azurerm_subnet" "subnet" {
  name                 = "mySubnet"
  virtual_network_name = "myVnet"
  resource_group_name  = "rgNetwork"
}

# Create Resource Group for VM
resource "azurerm_resource_group" "rg" {
  name = "myRg"
  location = "westeurope"
}

# call module
module "vm" {
  source = "github.com/nfrappart/azTerraVmLinuxAvZone?ref=v1.0.8"
  RgName = azurerm_resource_group.rg.name
  RgLocation = azurerm_resource_group.rg.location
  VmEnv = "test"
  VmNumber = "100"
  VmSize = "Standard_B1ms"
  KvId = data.azurerm_key_vault.kv.id
  ImagePublisherName = "Canonical"
  ImageOffer = "UbuntuServer"
  ImageSku = "18.04-LTS"
  SubnetId = data.azurerm_subnet.subnet.id
  RgVmDiag = "rgDiag"
  VmDiag = "mystoaccount"
}
To complement this DRY approach, you can also use for_each operator to iterate several time the same module and provision multiple VM with only one module call. For_each requires a map variable as input.
# source data for an existing keyvault
data "azurerm_key_vault" "kv" {
  name                = "mykeyvault"
  resource_group_name = "rgKeyVault"
}

# source data for an existing subnet
data "azurerm_subnet" "subnet" {
  name                 = "mySubnet"
  virtual_network_name = "myVnet"
  resource_group_name  = "rgNetwork"
}

# Create Resource Group for VM
resource "azurerm_resource_group" "rg" {
  name = "myRg"
  location = "westeurope"
}

locals {
  vms = {
    "200" = {
      "env" = "stage",
      "size" = "Standard_B1ms"
    },
    "201" = {
      "env" = "dev",
      "size" = "Standard_B1ms"
    },
    "202" = {
      "env" = "prod",
      "size" = "Standard_D2s_v3"
    }
  }
}

# call module
module "vm" {
  source = "github.com/nfrappart/azTerraVmLinuxAvZone?ref=v1.0.8"
  for_each = local.vms
  RgName = azurerm_resource_group.rg.name
  RgLocation = azurerm_resource_group.rg.location
  VmEnv = each.value.env
  VmNumber = each.key
  VmSize = each.value.size
  KvId = data.azurerm_key_vault.kv.id
  ImagePublisherName = "Canonical"
  ImageOffer = "UbuntuServer"
  ImageSku = "18.04-LTS"
  SubnetId = data.azurerm_subnet.subnet.id
  RgVmDiag = "rgDiag"
  VmDiag = "mystoaccount"
}
With the code above, by just editing the local named vms, you can deploy as much vm as you want with only one module call. I’ll go into further details in a futur post, using json files as data source for locals.
Version your modules
If you pay attention to the source attribute, you’ll see that it ends with a reference. This reference is a git tag. You could use a commit serial instead it’d work the same, since a tag is an commit alias.
The big take away here is that I highly recommend having one repo per module so you can version them separetely. Then you can have several versions of the same module living in different project without risking a breaking change.
Project A could have : source = "github.com/nfrappart/azTerraVmLinuxAvZone?ref=v1.0.5"
while while project B had : source = "github.com/nfrappart/azTerraVmLinuxAvZone?ref=v1.0.8"
Even if v1.0.8 induces breaking change (like removing some resources or changing some naming conventions), it would not break Project A until you change ref=v1.0.5 by another tag.