Deploy Vault HA in Azure - PART 2
UPDATES:
-2022-05-28: add auto-unseal with keyvault alternative. Full code should be shared through public github repository in a few weeks.
-2022-07-22: add DNS config to use cluster without application gateway (see Conclusion). Also, removed the Azure AD App Registration part to publish it back with Azure AD auth (oidc) future article.
Table of Content
1- Introduction
Last time, we had a high level look at how we can leverage Azure to deploy a Vault HA cluster. We took a detour to detail few tips and feature we need to use in the project. In this part 2, we go to the deployment of the cluster itself.
Below is what we aim for:

2- Prerequisites
To be able to go through this demo, you need to have a few things:
- an Azure AD tenant with global admin access (actually, Application Administror may be enough)
- an Azure subscription with owner role (to be able to delegate access to resources)
- since we’ll be using my json based vm module, you will also require to have an existing VNet, Subnet, storage account and keyvault (check here).
- an Azure private DNS zone
- an SSL certificate in your keyvault (more on that below)
- a proper provider configuration (I highly recommand remote backend but for testing, do as you like)
*At time of writing, this project is tested with terraform 1.1.9 and azurerm provider 3.7.0 as well as azuread provider 2.22.0
Your settings
First, let’s setup your input variables and json template for the vm module.
Pay attention to the comments on top of the certname variable.
Your variables.tf should look like this:
# Private DNS zone managed in your Azure Subscription
variable "privDomain" {
  default = "priv.mydomain.com"
}

# certificate object name in your keyvault
# This certificate MUST contain your cluster fqdn as well as your 3 nodes FQDN
# For example:
# - vault.priv.mydomain.com,
# - vault1.priv.mydomain.com,
# - vault2.priv.mydomain.com,
# - vault3.priv.mydomain.com
variable "certname" {
  default = "vaultpriv"
}

# app roles for app registration
variable "appRoles" {
  default = [
    "User",
    "Admin"
  ]
}

# path to json file containing vms specs
variable "configFileName" {
  default = "vm.json"
}

# resource group name for your project
variable "rgName" {
  default = "vault"
}

# provide existing keyvault name
variable "keyVault" {
  default = ""
}

# provide existing keyvault resource group name
variable "keyVaultRg" {
  default = ""
}

# provide existing storage account name
variable "vmDiagSta" {
  default = ""
}

# provide existing storage account resource group name
variable "rgVmDiagSta" {
  default = ""
}

# provide existing vnet name
variable "vnetName" {
  default = ""
}

# provide existing vnet resource group name
variable "vnetRg" {
  default = ""
}
Then since we use our reusable module, you need to prepare a json like below. Since the variable configFileNameabove is setup as vm.json you have to name it the same and leave it in the current folder. We use ubuntu but the bootstrap script should work with debian without too much tweaking.
As you ca see, we spread the 3 nodes on different availability zones to ensure better resilience.
{
  "vault1":{
    "size":"Standard_D2s_v3",
    "vmAdminName":"localadm",
    "publisher":"Canonical",
    "offer":"0001-com-ubuntu-server-focal",
    "sku":"20_04-lts-gen2",
    "version":"latest",
    "subnet":"coreHubSubnet",
    "zone":"1",
    "osDiskSize":"64",
    "disks":[
        {
          "lunId":"1",
          "size":"64"
        }
    ]
  },
  "vault2":{
    "size":"Standard_D2s_v3",
    "vmAdminName":"localadm",
    "publisher":"Canonical",
    "offer":"0001-com-ubuntu-server-focal",
    "sku":"20_04-lts-gen2",
    "version":"latest",
    "subnet":"coreHubSubnet",
    "zone":"2",
    "osDiskSize":"64",
    "disks":[
      {
        "lunId":"1",
        "size":"64"
      }
    ]
  },
  "vault3":{
    "size":"Standard_D2s_v3",
    "vmAdminName":"localadm",
    "publisher":"Canonical",
    "offer":"0001-com-ubuntu-server-focal",
    "sku":"20_04-lts-gen2",
    "version":"latest",
    "subnet":"coreHubSubnet",
    "zone":"3",
    "osDiskSize":"64",
    "disks":[
      {
        "lunId":"1",
        "size":"64"
      }
    ]
  }
}
3- The main Infrastructure Code
Now that we have our input parameters, we can work on the main.tf file which will provide us with the deployment plan.
Data Sources
First, we have a few data sources to load.
data "azurerm_client_config" "current" {}
data "azurerm_key_vault" "kvCore" {
  name                = var.keyVault
  resource_group_name = var.keyVaultRg
}
Provision the VMs for the cluster
Next step is to provision the VMs. We’ll be using our module from my personal github repository.
# 3 VM will be created as specified in the `vm.json` file
module "vault" {
  source         = "github.com/nfrappart/azTerraVmLinuxAvZoneJsonPool?ref=v1.0.4"
  configFileName = var.configFileName
  rgName         = var.rgName
  keyVault       = var.keyVault
  keyVaultRg     = var.keyVaultRg
  vmDiagSta      = var.vmDiagSta
  rgVmDiagSta    = var.rgVmDiagSta
  vnetName       = var.vnetName
  vnetRg         = var.vnetRg
}

# Add access policy for each VM identity so they can access the certificate and the app reg client secret
resource "azurerm_key_vault_access_policy" "vaultAccess" {
  for_each     = module.vault.vmIdentity
  key_vault_id = data.azurerm_key_vault.kvCore.id
  tenant_id    = data.azurerm_client_config.current.tenant_id
  object_id    = each.value

  key_permissions = [
    "Get", "Decrypt", "List", "UnwrapKey", "WrapKey"
  ]

  secret_permissions = [
    "Get", "List",
  ]

  certificate_permissions = [
    "Get", "GetIssuers", "List", "ListIssuers",
  ]
}
That’s it for the compute. Very simple since we are reusing an already written module.
2022-05-28 UPDATE:
If you decide to go the auto-unseal road, you will have to provision a few more resources, see below.
# Create key for Vault
resource "azurerm_key_vault_key" "vault" {
  name         = "vaultunseal"
  key_vault_id = data.azurerm_key_vault.kvCore.id
  key_type     = "RSA"
  key_size     = 4096

  key_opts = [
    "unwrapKey",
    "wrapKey",
  ]
}

# add some permissions to access keys in keyvault
resource "azurerm_key_vault_access_policy" "vaultAccess" {
  for_each     = module.vault.vmIdentity
  key_vault_id = data.azurerm_key_vault.kvCore.id
  tenant_id    = data.azurerm_client_config.current.tenant_id
  object_id    = each.value

  key_permissions = [
    "Get","List",
    "WrapKey","UnwrapKey",
  ]

  secret_permissions = [
    "Get", "List",
  ]

  certificate_permissions = [
    "Get", "
Custom script extension
Since the whole purpose is to automate as much as possible the deployment, we will be using a custom script extension to install and bootstrap vault. There will remain manual task at the end of this demo but we can do a whole lot of thing with terraform.
resource "azurerm_virtual_machine_extension" "bootstrapvault" {
  for_each             = module.vault.vmId
  name                 = "vaultInstall"
  virtual_machine_id   = each.value
  publisher            = "Microsoft.Azure.Extensions"
  type                 = "CustomScript"
  type_handler_version = "2.0"

  settings = jsonencode({
    "script" = base64encode(templatefile("bootstrap.sh.tpl", {
      domain      = var.privDomain,
      node        = each.key,
      kv          = data.azurerm_key_vault.kvCore.name,
      certificate = var.certname
      }
    ))
  })
  depends_on = [
    azurerm_key_vault_access_policy.vaultAccess,
    module.vault
  ]

  lifecycle {
    ignore_changes = [
      settings # we add a lifecycle to avoid redeploying the extension in case we make changes to the bash script
    ]
  }
}
2022-05-28 UPDATE:
If you decide to go the auto-unseal road, pass a few more variables into the templatefile via the custom script extension.
resource "azurerm_virtual_machine_extension" "bootstrapvault" {
  for_each             = module.vault.vmId
  name                 = "vaultInstall"
  virtual_machine_id   = each.value
  publisher            = "Microsoft.Azure.Extensions"
  type                 = "CustomScript"
  type_handler_version = "2.0"

  settings = jsonencode({
    "script" = base64encode(templatefile("bootstrap.sh.tpl", {
      domain      = var.privDomain,
      node        = each.key,
      kv          = data.azurerm_key_vault.kvCore.name,
      vaultKey    = azurerm_key_vault_key.vault.name,
      tenantId   = data.azurerm_client_config.current.tenant_id,
      certificate = var.certname
      }
    ))
  })
  depends_on = [
    azurerm_key_vault_access_policy.vaultAccess,
    azurerm_key_vault_key.vault,
    module.vault,
  ]
  lifecycle {
    ignore_changes = [
      settings
    ]
  }
}
templated bash script
Once again, we try to stay as “DRY” as possible. So instead of writing a script for each vm, we use the native terraform function templatefile() with some variables (see settings bloc in previous section).
You will need a file name bootstrap.sh.tpl. If you want to change the name, remember to modify the azurerm_virtual_machine_extension settings accordingly. You will however have to maintain the .tpl extension if I remember well.
So what does it do?
- Well first, the script install vault from the repository.
- Then sets up the data disk and folders for the application.
- We create a dedicated
vaultuser without home, and go on with the vault configuration file. You’ll notice that we retrieve variables from terraform there. - As seen in previous article (PART1) we download the SSL certificate and embedded private key and exctract them to the desired format.
- Finally we create a unit file so that vault runs as a service and start automatically after startup/reboot (keep in mind that it will be sealed after restart)
#!/bin/bash
#
# Bootstrap script to install vault
# Install Hashicorp repository for Vault
curl -fsSL https://apt.releases.hashicorp.com/gpg | sudo apt-key add -
sudo apt-add-repository "deb [arch=amd64] https://apt.releases.hashicorp.com $(lsb_release -cs) main"
sudo apt-get update && sudo apt-get install -y vault
sudo apt-get install -y jq

# Initialize datadisk
sudo parted /dev/sdc --script mklabel gpt mkpart xfspart xfs 0% 100%
sudo mkfs.xfs /dev/sdc1
sudo partprobe /dev/sdc1
sudo mkdir /vault
sudo mount /dev/sdc1 /vault
vault_uuid=$(blkid -o value -s UUID /dev/sdc1)
echo "UUID=$vault_uuid   /vault   xfs   defaults,nofail   1   2" | sudo tee -a /etc/fstab

# Create user without login for vault service
sudo adduser vault --shell=/bin/false --no-create-home --disabled-password --gecos GECOS

# Add config.hcl to destination folder
sudo tee -a /etc/vault.d/config.hcl > /dev/null <<EOT
listener "tcp" {
address = "0.0.0.0:8200"
cluster_address  = "0.0.0.0:8201"
tls_cert_file = "/vault/config/vault.cer"
tls_key_file = "/vault/config/vault.key"
}
storage "raft" {
path = "/vault/raft"
node_id = "${node}"
}
api_addr = "https://vault.${domain}:8200"
cluster_addr = "https://${node}.${domain}:8201"
#seal "azurekeyvault" {
#}
ui = true
disable_mlock = true
EOT
sudo chmod 755 /etc/vault.d/config.hcl
sudo chown vault:vault /etc/vault.d/config.hcl

# add fqdn for localhost
echo "127.0.0.1 ${node}.${domain}" | sudo tee -a /etc/hosts > /dev/null

# Retrieve Managed Identity access token
azure_token=$(curl 'http://169.254.169.254/metadata/identity/oauth2/token?api-version=2018-02-01&resource=https%3A%2F%2Fvault.azure.net' -H Metadata:true |  jq -r '.access_token')

# Add folder for storage backend
sudo mkdir /vault/raft

# Add folder for cert files
sudo mkdir /vault/config

sudo curl https://${kv}.vault.azure.net/secrets/${certificate}/?api-version=2016-10-01 -H "Authorization: Bearer $azure_token" |
jq -r ".value" | base64 -d | openssl pkcs12 -nocerts -out ./vaultpkcs.key -nodes -passin pass:
openssl rsa -in vaultpkcs.key -out vault.key

sudo cp ./vault.key /vault/config/

sudo curl https://${kv}.vault.azure.net/secrets/${certificate}/?api-version=2016-10-01 -H "Authorization: Bearer $azure_token" |
jq -r ".value" | base64 -d | openssl pkcs12 -nokeys -out ./vault.cer -passin pass:

sudo cp ./vault.cer /vault/config/

sudo chown -R vault /vault
sudo chgrp -R vault /vault
sudo chmod -R 755 /vault
sudo chmod 600 /vault/config/vault.key

# Create unit file for vault service
sudo tee -a /etc/systemd/system/vault.service > /dev/null <<EOT
[Unit]
Description=Vault
Documentation=https://www.vault.io/
Requires=network-online.target
After=network-online.target
ConditionFileNotEmpty=/etc/vault.d/config.hcl

[Service]
User=vault
Group=vault
ProtectSystem=full
ProtectHome=read-only
PrivateTmp=yes
PrivateDevices=yes
SecureBits=keep-caps
AmbientCapabilities=CAP_IPC_LOCK
Capabilities=CAP_IPC_LOCK+ep
CapabilityBoundingSet=CAP_SYSLOG CAP_IPC_LOCK
NoNewPrivileges=yes
ExecStart=/usr/bin/vault server -config=/etc/vault.d/config.hcl
ExecReload=/bin/kill --signal HUP $MAINPID
KillMode=process
KillSignal=SIGINT
Restart=on-failure
RestartSec=5
TimeoutStopSec=30
StartLimitInterval=60
StartLimitBurst=3
LimitNOFILE=65536
LimitMEMLOCK=infinity

[Install]
WantedBy=multi-user.target
EOT

# Enable and start the service
sudo systemctl daemon-reload
sudo systemctl start vault.service
sudo systemctl enable vault.service
2022-05-28 UPDATE:
If you decide to go the auto-unseal road, you will have to amend the above bootstrap script. Just modify theconfig.hclcreation part with the folowing.
sudo tee -a /etc/vault.d/config.hcl > /dev/null <<EOT
listener "tcp" {
address = "0.0.0.0:8200"
cluster_address  = "0.0.0.0:8201"
tls_cert_file = "/vault/config/vault.cer"
tls_key_file = "/vault/config/vault.key"
}
storage "raft" {
path = "/vault/raft"
node_id = "${node}"
}
api_addr = "https://vault.${domain}:8200"
cluster_addr = "https://${node}.${domain}:8201"

seal "azurekeyvault" {
  tenant_id      = "${tenantId}"
  vault_name     = "${kv}"
  key_name       = "${vaultKey}"
}

ui = true
disable_mlock = true
EOT
4- Setup HA Cluster
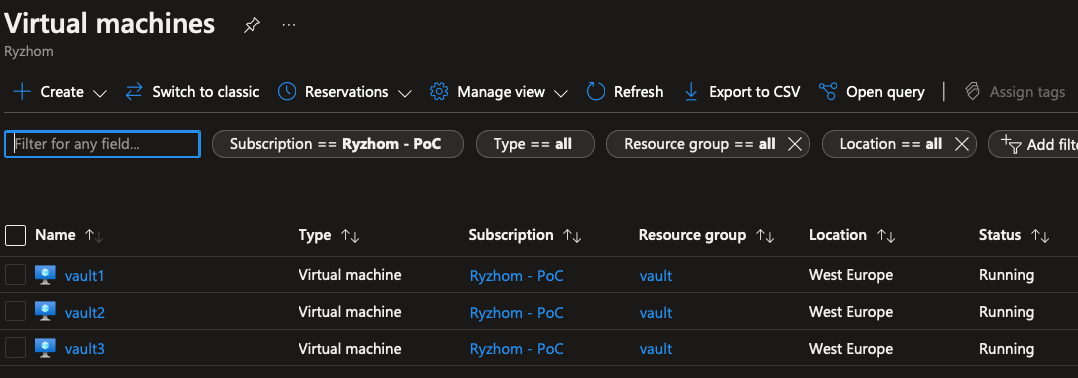
Now that’s great but for now, you have 3 standalone Vault Servers, all of them sealed and uninitialized.
If you didn’t change the json file you should have something like that:
For the following steps there’s not workaround manual configuration. Reason #1 beaing that Vault will generate its master key and the key shards, as well as the root token.
You can either use an Azure Bastion if you have one, or the serial console on the VMs to save some bucks.
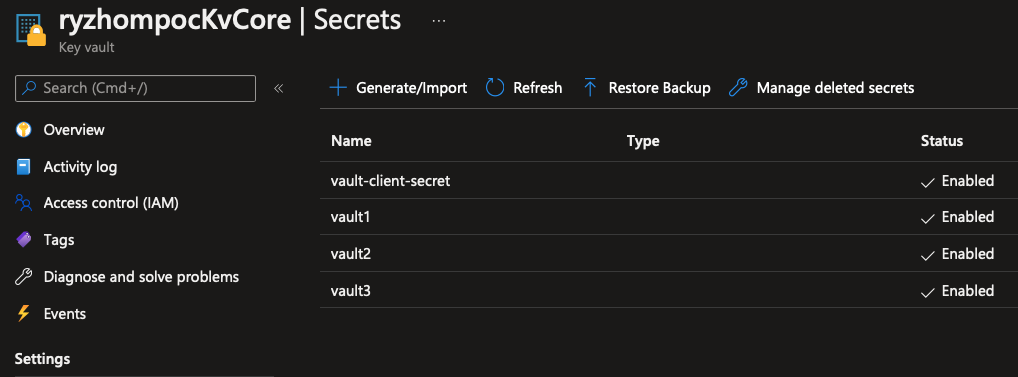
To log into the VM, the default user is localadm as defined in the vm.json file, unless you changed it. As for the passwords, the module has register them in the provided keyvault:
Initialize master node
Once you’re in the first node, follow the below commands to initialize vault.
# setup required variables
myprivdomain="priv.mydomain.com"
export VAULT_ADDR=https://${HOSTNAME}.${myprivdomain}:8200

# initialize vault
vault operator init
Then, vault wil output something like this:
localadm@vault1:~$ vault operator init
Unseal Key 1: FTmncRQigxxxxxxxxxxxxxxxxxxxxxxxxxxxxxxxxxxx
Unseal Key 2: KmPQpirL7xxxxxxxxxxxxxxxxxxxxxxxxxxxxxxxxxxx
Unseal Key 3: y+FsAIThJxxxxxxxxxxxxxxxxxxxxxxxxxxxxxxxxxxx
Unseal Key 4: Kz5CPZsdQxxxxxxxxxxxxxxxxxxxxxxxxxxxxxxxxxxx
Unseal Key 5: mPJifrXwmxxxxxxxxxxxxxxxxxxxxxxxxxxxxxxxxxxx

Initial Root Token: hvs.7JToxxxxxxxxxxxxxxxxxxxx

Vault initialized with 5 key shares and a key threshold of 3. Please securely
distribute the key shares printed above. When the Vault is re-sealed,
restarted, or stopped, you must supply at least 3 of these keys to unseal it
before it can start servicing requests.

Vault does not store the generated root key. Without at least 3 keys to
reconstruct the root key, Vault will remain permanently sealed!

It is possible to generate new unseal keys, provided you have a quorum of
existing unseal keys shares. See "vault operator rekey" for more information.
localadm@vault1:~$
These unseal keys and root token are extremely sensitive information. Actually, the root token is to be disabled after you finish setting up your users and policies, because the root policy allows you to basically destroy everything. So keep it away from bad people !
Now you can unseal the cluster. Because we didn’t specify otherwise, vault initialized with 5 keys and require 3 of them to unseal. You have to repeat the command below 3 times and provide a different unseal key each time. Again, keep your keys secured. You should distribute them to reliable team mates who will have to keep them secure. This way, as explained it the offical documentation, you need at least 3 people to unseal, or rekey Vault.
# Proceed to unseal
vault operator unseal
You can now check the status:
# Login with root token
vault login

# check status
vault status

# you should see something similar
localadm@vault1:~$ vault status
Key                     Value
---                     -----
Seal Type               shamir
Initialized             true
Sealed                  false
Total Shares            5
Threshold               3
Version                 1.10.3
Storage Type            raft
Cluster Name            vault-cluster-dad214b8
Cluster ID              771ffcb1-47bc-16a2-25ea-ab3c6a68b71a
HA Enabled              true
HA Cluster              https://vault1.priv.ryzhom.com:8201
HA Mode                 active
Active Since            2022-05-20T08:29:50.912682857Z
Raft Committed Index    42
Raft Applied Index      42
localadm@vault1:~$

# then check the raft cluster
vault operator raft list-peers

# only one node will appear
Node      Address                        State       Voter
----      -------                        -----       -----
vault1    vault1.priv.ryzhom.com:8201    leader      true
localadm@vault1:~$
Join node 2 & 3 to raft cluster
Now connect to node #2, and setup your shell and joint first node in RAFT.
# setup required variables
myprivdomain="priv.ryzhom.com"
export VAULT_ADDR=https://${HOSTNAME}.${myprivdomain}:8200

# join raft
vault operator raft join https://vault1.${myprivdomain}:8200
Now unseal it with the unseal key from the master node. Just like node #1, you will be asked for 3 key shares
vault operator unseal
Now login and check raft
# login with root token
vault login

# Check raft, it should show both nodes
vault operator raft list-peers

Node      Address                        State       Voter
----      -------                        -----       -----
vault1    vault1.priv.ryzhom.com:8201    leader      true
vault2    vault2.priv.ryzhom.com:8201    follower    true
localadm@vault2:~$
Repeat these steps for node #3 and you’re done :)
5- Conclusion
You now have a zone redundant Vault HA cluster. The missing part is the Azure Application Gateway to act as load balancer. We will see this in another post. However, if you want, you can setup a DNS record vault.priv.mydomain.com in your Azure Private DNS zone with all 3 nodes IP and use DNS round robin instead.*
Actually, Vault is designed to work like that. However this implies that the nodes are directly accessible from the client (either user or machine). If your network is segmented in a way that your vault subnet can’t be reached directly without a loadbalancer, then DNS round robin will be of no use to you.
Check the official documentation.
This is getting exciting :). Next time, we will be able to start playing with vault internal. We will show you oidc auth method to leverage AzureAD for user access, but also azure auth to authenticate VM with their managed identity, and of course use the secrets engine to help you understand how to use Vault to secure your workload and application delivery.
*If you want to use DNS round robin, just add the following resource to your code.
resource "azurerm_private_dns_a_record" "vault" {
  name                = "vault"
  zone_name           = data.azurerm_private_dns_zone.dns.name
  resource_group_name = data.azurerm_private_dns_zone.dns.resource_group_name
  ttl                 = 300
  records             = [ for k,v in module.vault.vmName : v ]
}