Setup OIDC for Azure AD with Vault
Table of Content
1- Introduction
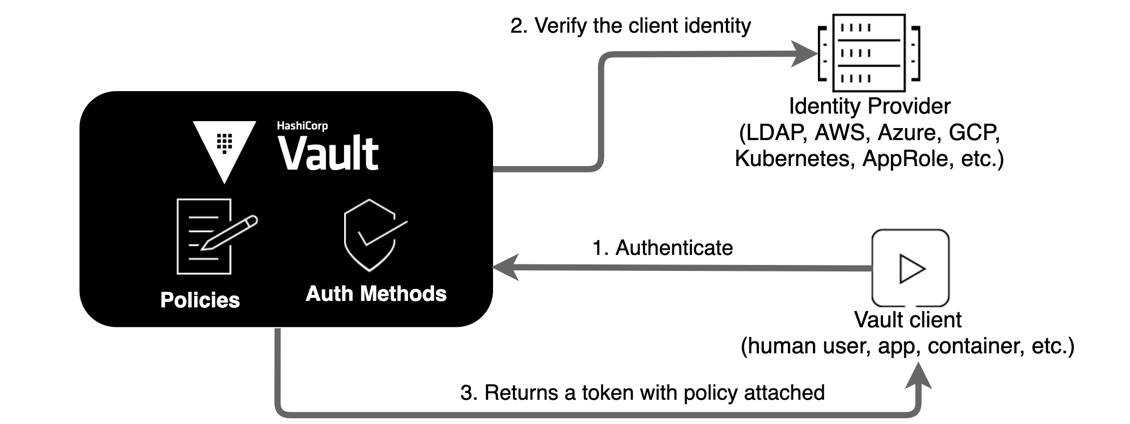
Vault has the ability to use multiple identity provider (IDP) with a feature called authentication methods. By default the token auth method is the only one enabled. That is why you get a root token after initializing your cluster.
Fundamuntally, every authentication will result in a token with policies attached. But auth method gives you a way to generate those token based on an identity provider.
Since I pass most of my days on azure the obvious IDP is Azure AD. To connect with external IDP, vault uses these auth methods, and there are quite a few available. To use Azure AD, we have to rely, not on ldap or kerberos, but on Open ID Connect (OIDC).
I know, I know, naming their IDP Azure Active directory was such a bad move, because it’s so much more than a AD. :)
Below is a nice picture I shamelessly ripped of the official documentation:
2- Prerequistes
Since we rely on external IDP, as you probably guessed, we will have to prepare said IDP to be used by Vault. If you’re familar with SSO, you know the drill: app registration.
We have to create an Azure AD application, with proper settings for OIDC, and adequat microsoft graph api permissions. This can easily be done via Azure portal or azCLI az ad commands, but I’m stubborn and will go the Terraform road. ^_^
You will also need and existing Azure Keyvault to store your application client secret.
Warning:
Bear in mind that, for the sake of this article, I use terraform with az login, with a global admin account with owner role on the subscription. I won’t go into the details of the terraform authentication setup (nor state configuration). BUT you should carefully think how you manage governance if you want to use Vault effectively.
3- Terraform Providers
For this project you will need at least these 3 providers:
- azurerm: to provision stuff on Azure
- azuread: to provision azure AD application
- vault: to setup you authentication method and everything else revolving around (policies, external groups, etc.)
Thus, your provider config should include the following:
provider "vault" {}
provider "azuread" {}
provider "azurerm" {
  features {}
}
I strongly suggest you pin the provider version to avoid issues later on, with new version and potential breaking changes.
About provider authentication:
Bothazurermandazureadwill use your az login token if you don”t specify otherwise, hence my warning in 2- Prerequisites.
Vault needs you to provide valid token and an api address. To do so, you have to setupVAULT_ADDRenvironment variable ashttps://myvault.domain.com:port. As for the token, if you’ve just bootstrap your cluster, a simplevault loginthen providing theroot tokento the prompt will do the trick.
4- Terraform Code
Now it’s time to dive into the code that will setup your Vault integration with Azure AD with a simple terraform apply :)
Input Variables
First, let’s have a look at the input variables.
variable "kvRg" {
  description = "existing keyvault resource group"
  type = string
}

variable "kvName" {
  description = "existing keyvault name"
  type = string
}

variable "privDomain" {
  description = "domain name where your vault cluster is published"
  type = string
}

variable "appRoles" {
  description = "the azure ad app roles you want to create"
  type = map(any)
  default = {
    "Admin" = {
      "description" = "Vault admin are authorized to setup the application",
      "policies" = ["admin"]
    }
  }
}
As you a can see, there aren’t that much.
However the appRoles needs more explanation. The default value shows you an example for one app role. The idea is to have your app roles names as key, and a description as well as a list of (vault) policies as key/value pairs. This nested map variable is used to create both app roles in azure AD application, and external groups identity in vault.
You will note that the policies attribute is a list. Thus, you can come back later, as you build all your policies and governance in Vault, to have terraform create new app roles or update the policies assigned to existing roles.
Data Sources
We will need a few data sources. The azurerm_client_config is in almost all my TF projects as it allows me to easily retrieve subscription and or current identity (principal) used by Terraform.
The azuread_client_config does roughly the same, but for Azure AD.
Then, there is the azuread_application_published_app_ids which is quite handy, and help us get the desired app ids for API published by Microsoft. However this is based on un unofficial list (see documentation).
Finally, as seen in the input variables, we source a usable keyvault*, as well as a private DNS zone.
data "azurerm_client_config" "current" {}
data "azuread_client_config" "current" {}
data "azuread_application_published_app_ids" "well_known" {}

data "azurerm_private_dns_zone" "dns" {
  name = var.privDomain
}

data "azurerm_key_vault" "kv" {
  name                = var.kvName
  resource_group_name = var.kvRg
}
*Don’t forget to ensure the principal used by terraform has the adequat access policy or RBAC role on the keyvault secrets (wether it’s your own username or a service principal).
Azure AD Application
Now we’re getting serious, and start to work on the actual stuff: the Azure AD App Registration.
There are a few important things that needs to be taken care of.
-
random_uuid:
Since there is no automamted uuid generation for app roles in azure AD Applications, we have to generate some. -
azuread_application:
This is the application itself. You can see that we limit the sign-in to user from our own tenant only, withsign_in_audience = "AzureADMyOrg". Also theapp_roleblock is dynamic and loops over theappRolesinput variable seen above.
This does 2 things for us: keep the code DRY and allow easier and more flexible updates to your role management when you decide to change or add app roles.
Another very important point is the oidc claimgroup_membership_claims = ["ApplicationGroup"]. Instead of claiming groups or security groups (I don’t remember which one, to be honest), we ask for theApplicationGroupwhich represents the azure ad application app roles.
Therequired_resource_accessblock is where you can set either delegated or application permissions. For this specific usage, I find the delegated permission, with admin consent is enough, as there shouldn’t be any request from vault using this principal, without an auth request from a user.
Last but not least,webblock defines the redirect URIs used for the token exchange with Vault.
# AZURE AD app registration config for vault
resource "azuread_service_principal" "msgraph" {
  application_id = data.azuread_application_published_app_ids.well_known.result.MicrosoftGraph
  use_existing   = true
}

resource "random_uuid" "appRole" {
  for_each = var.appRoles
}

resource "azuread_application" "vault" {
  display_name    = "vault"
  #logo_image       = filebase64("./vault_logo.png")
  owners           = [data.azuread_client_config.current.object_id]
  sign_in_audience = "AzureADMyOrg"

  dynamic "app_role" {
    for_each = var.appRoles
    content {
      allowed_member_types = ["User"]
      description = app_role.value.description
      display_name = app_role.key
      enabled = true
      id = random_uuid.appRole[app_role.key].id
      value = lower(app_role.key)
    }
  }

  group_membership_claims = ["ApplicationGroup"]

  required_resource_access {
    resource_app_id = data.azuread_application_published_app_ids.well_known.result.MicrosoftGraph
    resource_access {
      id = azuread_service_principal.msgraph.oauth2_permission_scope_ids["User.Read"]
      type = "Scope"
    }
  }

  web {
    homepage_url = "https://vault.${var.privDomain}:8200"
    redirect_uris = [
      "http://localhost:8250/oidc/callback",
      "https://vault.${var.privDomain}:8250/oidc/callback",
      "https://vault.${var.privDomain}:8200/ui/vault/auth/oidc/oidc/callback"
    ]

    implicit_grant {
      access_token_issuance_enabled = true
      id_token_issuance_enabled     = true
    }
  }
}
Create Azure AD Application Principal and Secret
So, we have an azure AD application. great!
Now what?
Well, the objective is to provide a way for vault to query Azure AD ,and verify authentication request, as they come to its API (wheter via CLI, UI or http Calls).
To make this possible Vault needs a principal and a secret to authenticate, impersonation the azure AD application we just created. Additionnaly we need to grant this principal some permissions to go through, with a user login process.
So far, with the delegated approach (see Azure documentation for details between application and delegated permissions) a simple User.Read claim proved sufficient. Since a user can read its own groups and roles, Vault doesn’t need more. Of course if we wanted vault to manage Azure AD ressources as a backend service, without a user logged in, that would be a different story.
Also, to keep track of the application secret, we create an azure keyvault secret. We could also store it in a Vault kv secret engine, but I assume if you are setting up your auth methods, you don’t have secret engines yet.
resource "azuread_application_password" "vault" {
  application_object_id = azuread_application.vault.object_id
}

# Create service principal for application
resource "azuread_service_principal" "vault" {
  application_id               = azuread_application.vault.application_id
  app_role_assignment_required = false
  owners                       = [data.azuread_client_config.current.object_id]
}

# Grant admin consent for delegated permission
resource "azuread_service_principal_delegated_permission_grant" "vault" {
  service_principal_object_id          = azuread_service_principal.vault.object_id
  resource_service_principal_object_id = azuread_service_principal.msgraph.object_id
  claim_values                         = ["User.Read"]
}

resource "azurerm_key_vault_secret" "vault" {
  name         = "vault-client-secret"
  value        = azuread_application_password.vault.value
  key_vault_id = data.azurerm_key_vault.kv.id
}
WARNING:
Remember that Terraform stores everything in its state file in plain text. Passwords included. So, ensure you use an encrypted remote backend (like azurerm) and restrict, as much as possible, access to the storage account used as backend (firewall policy, private endpoint + nsg rules, rbac, etc.).
You could also add anignore_changeslife cycle on sensitives ressources and manually rotate the secret after terraform provisioned the auth backend. Your call.
Create Vault Auth Backend
We finally get into Vault configuration itself. Regarding the auth method, there isn’t that much to do actually. Just 2 things:
- create backend
- create backend role (at least one)
# VAULT Backend Config
resource "vault_jwt_auth_backend" "azuread" {
  description        = "Azure AD authentication backend"
  path               = "oidc"
  type               = "oidc"
  oidc_discovery_url = "https://login.microsoftonline.com/${data.azurerm_client_config.current.tenant_id}/v2.0"
  oidc_client_id     = azuread_service_principal.vault.application_id
  oidc_client_secret = azurerm_key_vault_secret.vault.value
  default_role       = "azuread"

  tune {
      default_lease_ttl = "1h"
      max_lease_ttl = "1h"
      token_type = "default-service"
  }

}

resource "vault_jwt_auth_backend_role" "azuread" {
  backend        = vault_jwt_auth_backend.azuread.path
  role_name      = "azuread"
  token_policies = ["default"]

  user_claim   = "email"
  groups_claim = "roles"
  role_type    = "oidc"
  allowed_redirect_uris = [
    "http://localhost:8250/oidc/callback",
    "https://vault.${var.privDomain}:8200/ui/vault/auth/${vault_jwt_auth_backend.azuread.path}/oidc/callback"
  ]
}
You’ll notice that the resource vault_jwt_auth_backend says jwt not oidc, but it’s just that the terraform provider uses the same resource with different attributes values.
The path is where the auth method mount will be set in Vault API. oidc is the default, so I kept it the same. We could go a step further, and use an input variable to be able to easily customize it, but we’d need to substitute it in the app registration redirect URIs accordingly. Same goes for the URIs set in the backend role below.
As you can see, for the oidc_client_secret attribute, we retrieve the secret from the keyvault resource (from the state).
Regarding the vault_jwt_auth_backend_role there are a few key points.
First, token_policies provides a list of the default policies anyone, successfully logging in, will be assigned.
The default policy is not a bad place to start so you can login and see minor things. A better way would be to create a minimalistic policy and use it as default for this role.
Then, you have 2 claims which let you define which attribute, from the token, you use inside vault. Here we use email as the user name, and roles as the user group. Using roles is what tells vault to retrieve the azure AD app role from the user and not some security groups (we could discuss the pros and cons of this choice some other time).
Map Azure AD app roles with Vault external groups
Finally we need to somehow tell vault which authorization each azure AD app roles should grant each users.
To do so we leverage external groups and group aliases.
External groups are provisioned from the appRoles variable. If you remember what we said earlier, this variable gives the name of the role and assign a list of policies for said role. The policies can be created later, Vault doesn’t care if they already exist or not.
Then we map the external group with the azure AD app role through the group alias. The group alias will reference the external group with its canonical_id attribute (which is the external group id), and the azure AD app role with its name attribute (which is the name of the app role in azure AD).
Remarque:
This is different from Hashicorp Official documentation which relies on azure AD groups and not azure AD app roles. In case of Azure AD groups, the vault group alias name must be the azure AD group object ID. But since app roles don’t have such ids, it appears mapping with the name is enough.
resource "vault_identity_group" "azureadAppRoles" {
  for_each = var.appRoles
  name     = lower(each.key)
  type     = "external"
  policies = each.value.policies
}

resource "vault_identity_group_alias" "groupAlias" {
  for_each       = var.appRoles
  name           = lower(each.key)
  mount_accessor = vault_jwt_auth_backend.azuread.accessor
  canonical_id   = vault_identity_group.azureadAppRoles[each.key].id
}
5-Conclusion
That’s it folks! So to summarize, to be able to log into vault with your azure AD account there is quite a bit of setup on the Azure side (azure AD app reg, azure ad sp, azure ad app secret, azure ad app roles…). Then, you have to create the auth backend, at least one role, and rely on external groups and group aliases to pseudo-sync azure AD app roles with Vault groups.
Last thing, this is UI oriented. To validate the 2FA challenge, even if you login using the CLI, you will need to validate the authentication through your browser. So if you manage vault remotely through an ssh bastion host, this can be problematic as you won’t be able to complete the URL redirect at the end of the workflow.