Vault kubernetes auth with AKS
Table of Content
- Introduction
- Requirements
- kubernetes auth
- About Zero Trust
- It’s all JWT again
- Key settings
- Helm Chart
- Let’s Jam!
- Prepare Vault
- Aks
- Injector
- Secret injection
- Troubleshoot
- Conclusion
1- Introduction
A couple month ago, I made a poll on linkedin to decide which topic I should cover for my next blog. Although I made detour, with a quick guide on how to generate Let’s Encrypt certificates with Azure Pipelines, here we are with the subject the most requested: vault kubernetes auth.
Since Azure is my playing field, we’re going to showcase how to implement it for an AKS cluster. As for the use case, nothing special here, we will have a look at the injector. I’m not very interested in the csi driver because of its limitations, and I haven’t tried the recentely released vault Operator. That doesn’t leave me with much choice, does it? ^_^’
We could use the kubernetes auth method with a vault aware application, but since I don’t have such app lying around to play with, I’m going to use vault injector with the Helm Chart.
2- Requirements
For this little project, we need 2 things:
- an AKS cluster
- an existing (external) vault cluster
There’s no question about the necessity for a kubernetes cluster since the whole purpose is to showcase kubernetes auth method. However I’m a bit picky when it comes to hosting security oriented solutions like vault. Same with monitoring. IMHO, you should never host such tools in the same infra as your production workloads.
If you plan using kubernetes secret engine it’s a no brainer, you have to use an external vault cluster.
3- Kubernetes auth method
Now that we’ve clarified all the above, we can talk about the topic. First off, there are some considerations regarding zero trust when using kubernetes auth with vault. Let me explain.
3-a About Zero Trust
When you adopt (or try to) zero trust principals, you authenticate and authorize everything and assume breach. However, like so many cloud native identity management, this authentication method relies on oidc/jwt. It assumes that your kubernetes cluster, aks in our case, is a trusted identity provider. Just like when you used Azure AD (now called Entra ID) with oidc auth for vault, Azure AD is a trusted identity provider. I always find it interesting to buzz about zero trust and yet call external system trusted. ^^
There’s nothing inherently wrong about this approach, but it has to be said, so you take proper countermeasures. Basically, the risks shifts from the workload itself to the RBAC and IAM of the kubernetes cluster.
3-b It’s all JWT again!
How does it work?
Once again, with JWT, the principles are similar with what we see elsewhere. Kubernetes uses Service Accounts as a mean to provide identities to pods. Then when a pod is deployed with one of these idendities assigned, a service account Token is created and mounted on a projected volume at /var/run/secrets/kubernetes.io/serviceaccount. Note that these tokens are JWT Token signed by the cluster which is how their authenticity can be verified.
There is a neat diagram that explains the workflow in the hashicorp tutorials (see full tutorial here)
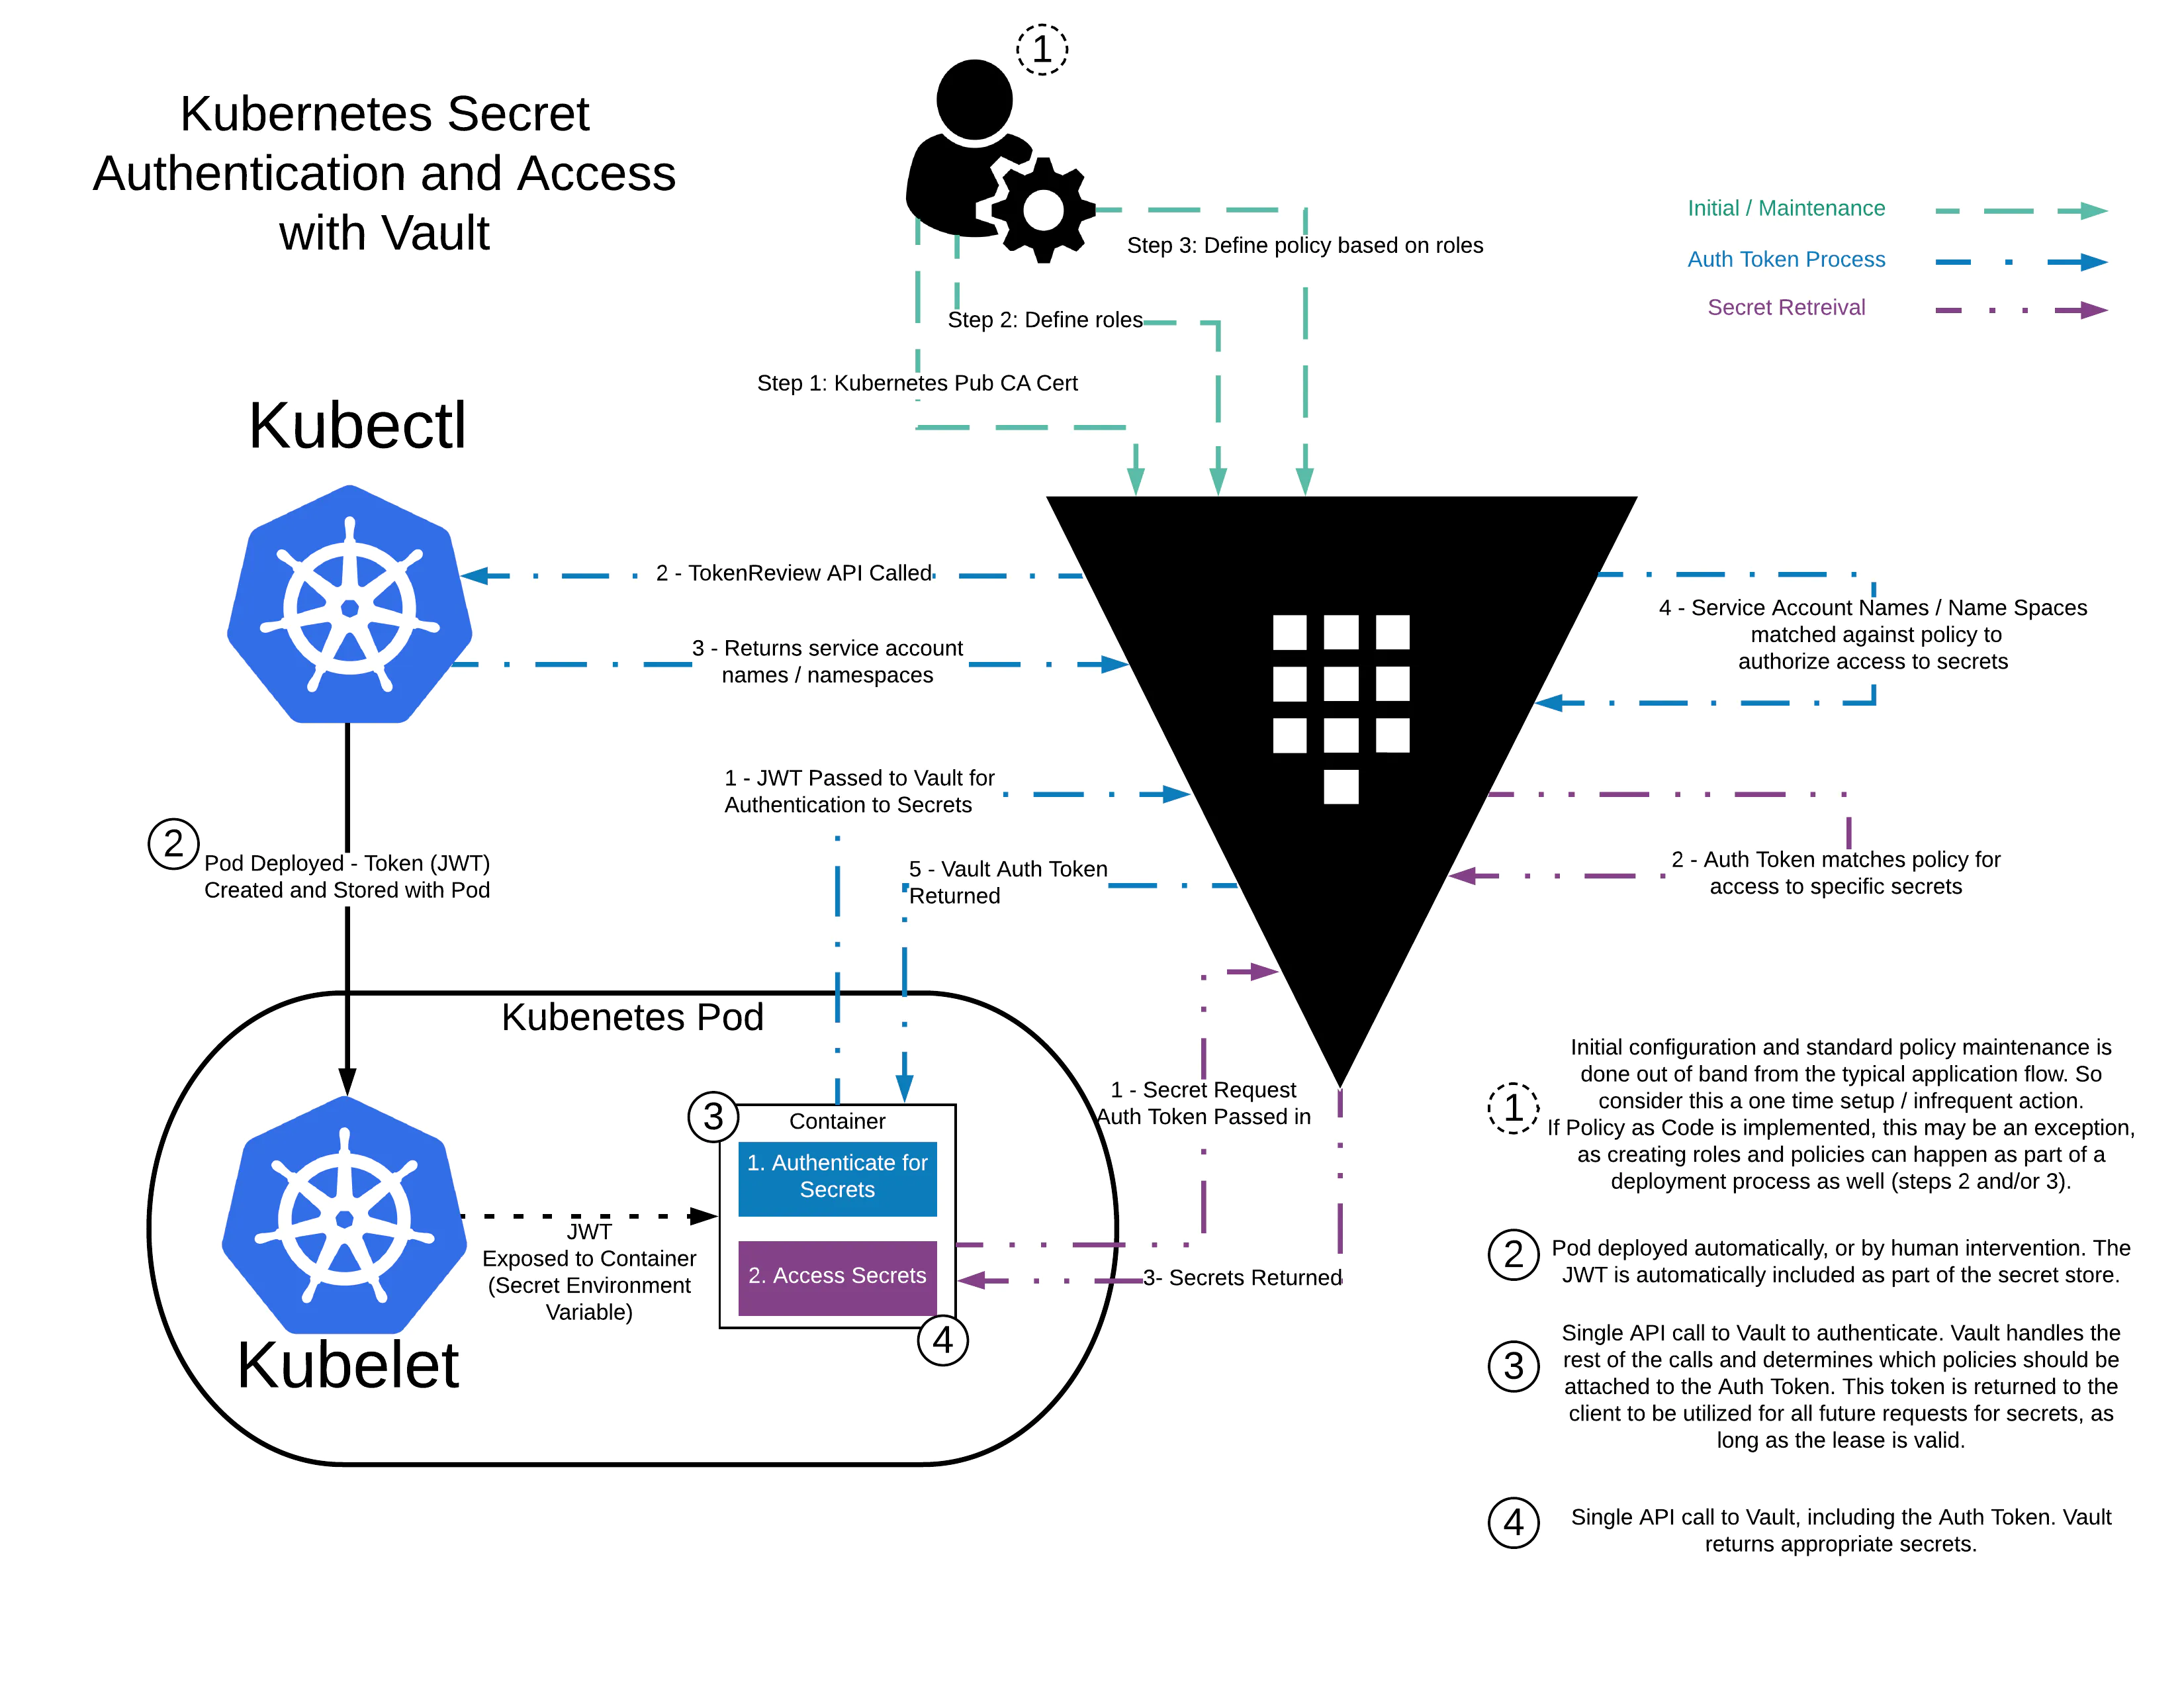
3-c key settings
As always, when configuring applications/platforms to work together, it’s a multi stage process (because of dependencies) which require some key settings. Again, the above mentioned tutorial provides what we need, but we will transpose with their AKS counterparts.
- kubernetes host:
can be referenced from your aks cluster terraform resource or data source - kubernetes CA certificate:
can be referenced from your aks cluster terraform resource or data source - kubernetes cert issuer:
will require to activate oidc issuer on the cluster and retrieve the url from data terraform resource or data source - token reviewer JWT:
will require to manually create a long lived service account token with the permission to review tokens
Back to this staged process we were talking about here is how it will articulate:
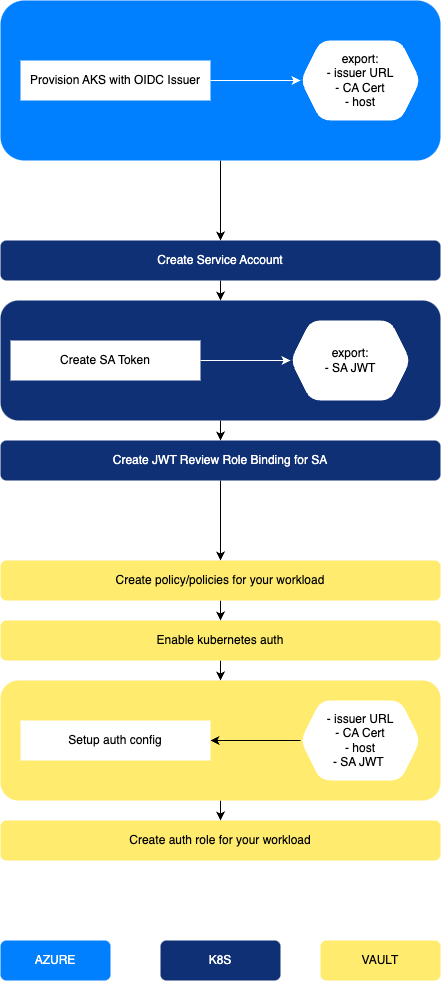
First stage is about provisiniong resources on Azure, second stage is within Kubernetes (AKS), third and last is setting up Vault.
After initial setup, to use the solution, it will be configuration back and forth between K8s and Vault.
About the token reviewer JWT:
In the official documentation and tutorials, you are guided to use the Service Account created for the injector (default value set totruein the helm chart), and retrieve its token to use it as kubernetes token reviewer in the auth method config. However you can use any other SA Token for the auth method, as long as it has the proper role binding. That’s what is described above. It’s easier to keep everything in terraform doing so.
4- Helm chart
Now, let’s address the use case: Vault Injector in kubernetes.
If you’re not familiar with the injector, the idea is pretty simple. You deploy the injector in your kubernetes cluster which allow you to add a vault agent sidecar in your pods, based on annotations. Then you can inject secrets in your pods, depending on what your agent is authorized to retrieve (i.e what the kubernetes auth method role, assigned to your agent, is allowed to access).
The behind the scenes is not quite as simple though, relying on a mutation webhook to deploy the agent, then using an init container to authenticate with vault, before starting the vault agent sidecar with its vault token, and finally starting your containers and mounting retrieved secrets in a file. If it sounds like a mess, the beauty of it is in the fact that you can leverage vault without your app being aware. Which facilitate transitionning to vault without touching the code.
More on the injector here.
Anyway. The helm chart.
To setup and deploy the injector, we usually rely on the helm chart, provided by Hashicorp. There is a handful of options to suits your specific needs, and in our project, there is one in particular: the option to use an external Vault Cluster.
You see, the chart is made to deploy the whole solution, vault, the injector, etc. But as I stated in 2- Requirements, having your secret management inside your cluster may not be the smartest idea. You could however have it in a separate kubernetes cluster, if you prefer it over VMs. But, you git the idea. I recommend separation of duties and have your vault clusters running on a different infra.
Below is the list of the charts values we’ll be using:
- global.enabled:
is set to false to deploy only what we want - injector.enabled:
will of course be set to true since that’s what we want to use - injector.replicas:
injector is a deployment, we can specify how many replicas we want at all time - injector.leaderElector.enable:
since we specify multiple replicas, we need an election - injector.externalVaultAddr:
address of your vault cluster (i.e. what you set for VAULT_ADDR env variable) - injector.authPath:
path to use for the kubernetes authentication method - injector.logLevel:
well… log level… ¯\(ツ)/¯ - injector.image.tag:
tag for vault-K8s version - injector.agentImage.tag:
tag for vault agent version - server.serviceaccount.create:
create a service account for injector (will be set tofalse) - injector.nodeSelector.agentpool:
annotation for node selection
5- Let’s jam!
5-a Prep Vault
Before we begin with all the K8s stuff and helm charts and all, we have to prep vault with some simple tasks:
- enable a secret engine (kv) and
- create a policy for our workload.
Quick reminder, when setting up an authentication method, you create roles to which policies are attached. Then when authenticating, a client can claim a role and get the associated policies.
For our demo, I’ll be using a busybox.
As I said, I don’t have fancy vault aware application with front and back and whatnot. So first things first, let’s create a policy with a busybox.hcl definition file.
path "secret/*" {
  capabilities = ["list", "read"]
}
Then, create it.
vault policy write busybox ./busybox.hcl
Very basic.
Or you can do it with terraform:
resource "vault_policy" "policies" {
  name = busybox
  policy = file("./busybox.hcl")
}
For the secret engine, nothing beats the good old key value for a demo.
vault secrets enable -version=2 -path=secret kv
or using terraform
resource "vault_mount" "kvv2" {
  path        = "secret"
  type        = "kv-v2"
  description = "Static secret engine"
}
As you can see, the vault provider is really straightforward.
oh, one last thing, you have to create at least one secret so we can retrieve it from our pod later:
vault kv put -mount=secret devops token=pat
You will get a response similar as:
=== Secret Path ===
secret/data/devops

======= Metadata =======
Key                Value
---                -----
created_time       2023-07-19T09:26:02.041244702Z
custom_metadata    <nil>
deletion_time      n/a
destroyed          false
version            1
The you can check the value your inserted:
vault kv get secret/devops
And get the response:
=== Secret Path ===
secret/data/devops

======= Metadata =======
Key                Value
---                -----
created_time       2023-07-19T09:26:02.041244702Z
custom_metadata    <nil>
deletion_time      n/a
destroyed          false
version            1

==== Data ====
Key      Value
---      -----
token    pat
5-b Provision AKS Cluster
Now because all of this was to show how to use kubernetes auth method, we need a K8s cluster. You can use my public module for that: ryzhom/aks/azurerm
here is an example usage:
module "aks" {
  source  = "ryzhom/aks/azurerm"
  version = "1.0.1"
  cluster_name = "demo"
  location = "francecentral"
  default_node_pool = {
    enable_auto_scaling = true,
    min_count           = 1,
    max_count           = 5,
    max_pods            = 50,
    vm_size             = "Standard_D2s_v3"
  }
  node_pool = {
    demo = {
      vm_size         = "Standard_D2s_v3",
      priority       = "Regular"#"Spot",
      eviction_policy = "Delete",
      mode           = "User",
      min_nodes       = 1,
      max_nodes       = 5,
      auto_scaling    = true,
      max_pods        = 50,
      taints         = [],
      labels         = {}
    }
  }
  sku = "Free"
  k8s_version = "1.26.3"
  service_cidr = "172.19.0.0/16"
  pod_cidr = "172.17.0.0/16"
  acr = {
    myacrname = "rg-acr"
  }
  vnet = "vnet-demo"
  rg_vnet = "rg-network"
  snet = "subnet-aks"
  law = "loganalytics"
  rg_law = "rg-log"
}
This module uses Azure CNI overlay, but you can bring your own aks cluster for this lab, as long as you have the oidc issuer enabled.
5-c Configure auth method and deploy injector
Finally getting to the core of the topic. First, you will need to setup the provider, and for that we have to retrieve information from the cluster using data sources.
Note:
For that very reason we have to use a layering/staged approach as described in 3-.
Setup kubernetes & helm providers
data "azurerm_kubernetes_cluster" "aks" {
  name                = "demo"
  resource_group_name = "rg-demo"
}

provider "kubernetes" {
  host                   = data.azurerm_kubernetes_cluster.aks.kube_admin_config.0.host
  username               = data.azurerm_kubernetes_cluster.aks.kube_admin_config.0.username
  password               = data.azurerm_kubernetes_cluster.aks.kube_admin_config.0.password
  client_certificate     = base64decode(data.azurerm_kubernetes_cluster.aks.kube_admin_config.0.client_certificate)
  client_key             = base64decode(data.azurerm_kubernetes_cluster.aks.kube_admin_config.0.client_key)
  cluster_ca_certificate = base64decode(data.azurerm_kubernetes_cluster.aks.kube_admin_config.0.cluster_ca_certificate)
}

provider "helm" {
  kubernetes {
    host = data.azurerm_kubernetes_cluster.aks.kube_admin_config.0.host
    username = data.azurerm_kubernetes_cluster.aks.kube_admin_config.0.username
    password = data.azurerm_kubernetes_cluster.aks.kube_admin_config.0.password
    client_certificate = base64decode(data.azurerm_kubernetes_cluster.aks.kube_admin_config.0.client_certificate)
    client_key = base64decode(data.azurerm_kubernetes_cluster.aks.kube_admin_config.0.client_key)
    cluster_ca_certificate = base64decode(data.azurerm_kubernetes_cluster.aks.kube_admin_config.0.cluster_ca_certificate)
  }
}
Prepare charts values in a json
yeah… You know me, I like to play with json and locals to manipulate configuration input. If you prefer you can do all that with hcl and map(object) type variable (which enables you to leverage variable validation). It’s actually how the aks module above is using.
Anyway.
here is the charts.json I use.
{
  "vault":{
    "repository":"https://helm.releases.hashicorp.com",
    "chart":"vault",
    "version":"0.25.0",
    "sets":{
      "global.enabled":"false",
      "injector.enabled":"true",
      "injector.replicas":"3",
      "injector.leaderElector.enable":"true",
      "injector.externalVaultAddr":"https://vault.mydomain.com:8200",
      "injector.authPath":"auth/aks",
      "injector.logLevel":"info",
      "injector.image.tag":"1.2.1",
      "injector.agentImage.tag":"1.14.0",
      "server.serviceaccount.create":"false"
    }
  }
}
be mindfull of the
injector.authPathvalue. It will be used in vault setup below. For this demo let’s useaks.
You can add other objects in the file if you want to deploy other charts, as long as you follow the format:
  "chart_name":{
    "repository":<chart url>,
    "chart":<chart>,
    "version":<chart version>,
    "sets":{
      <parameter1.full.path>:<value>,
      <parameter2.full.path>:<value>,
      <parameter3.full.path>:<value>
    }
  }
Now we can decode the json in a local to insert its data:
locals {
  charts = jsondecode(file("charts.json"))
}
Now we create a namespace for every chart (well, just for vault in that case)
resource "kubernetes_namespace_v1" "namespace" {
  for_each = local.charts
  metadata {
    labels = {
      usage = lower(each.key)
    }
    name = lower(each.key)
  }
}
Then looping again over the charts local, we deploy all charts defined in the json file.
resource "helm_release" "charts" {
  for_each = local.charts
  name       = each.key
  namespace  = each.key
  repository = each.value.repository
  chart      = each.value.chart
  version    = each.value.version

  dynamic "set" {
    for_each = each.value.sets
    content {
      name = set.key
      value = set.value
    }
  }
  depends_on = [
    kubernetes_namespace_v1.namespace
  ]
}
Time to setup vault injector. Since we chose to manually crate the service account for vault, let’s do that:
resource "kubernetes_service_account_v1" "vault" {
  metadata {
    name = "vault"
    namespace = "vault"
  }
}
Now, that service account needs to be allowed to review JWT from the aks cluster. But it also needs a token that we can pass to vault configuration.
resource "kubernetes_cluster_role_binding_v1" "vault" {
  metadata {
    name = "role-tokenreview-binding"
  }
  role_ref {
    api_group = "rbac.authorization.k8s.io"
    kind      = "ClusterRole"
    name      = "system:auth-delegator"
  }
  subject {
    kind      = "ServiceAccount"
    name      = kubernetes_service_account_v1.vault.metadata[0].name #"vault"
    namespace = "vault"
  }
}

resource "kubernetes_secret_v1" "vault" {
  metadata {
    annotations = {
      "kubernetes.io/service-account.name" = kubernetes_service_account_v1.vault.metadata[0].name
    }
    name = "vault"
    namespace = "vault"
  }
  type = "kubernetes.io/service-account-token"
}
About Kubernetes secrets:
Manually creating a service account token, creates a long lived token. In recent versions, when assigning a service account to a pod, a short lived token is generated and projected to the default mount. It allows for shorter lived token and cleaner lifecycle management.
We often read that kubernetes secrets are not secure. And that is true. However this particular secret does not provide too much access (review issuer) and is in vault’s namespace. If some threat actor has already access to resources in your vault namespace, a mere reviewer token is the least of your problems…
Fine, we have setup on the kubernetes side.
We can go on with Vault. We’ll keep using terraform for that because I’m a fanboy :)
We have to create:
- authentication method
- authentication role
The role is where we need to feed information from previous tasks, such as cluster config (cert, host, oidc issuer url) and the infamous secret, the service account token.
As explained before, we rely on a manually created token because we want to feed it to terraform. We could just let the TokenRequest API, but since it is bound to the lifecycle of the Pod, how would we update vault in case of the injector being recreated for some reason? More about the service account tokens here.
resource "vault_auth_backend" "kubernetes" {
  path = "aks"
  type = "kubernetes"
}

resource "vault_kubernetes_auth_backend_config" "kubernetes" {
  backend                = vault_auth_backend.kubernetes.path
  kubernetes_host        = data.azurerm_kubernetes_cluster.aks.kube_admin_config.0.host
  kubernetes_ca_cert     = base64decode(data.azurerm_kubernetes_cluster.aks.kube_admin_config.0.cluster_ca_certificate)
  token_reviewer_jwt     = kubernetes_secret_v1.vault.data.token
  issuer		 = data.azurerm_kubernetes_cluster.aks.oidc_issuer_url
  #issuer                 = "api"
  #issuer                 = "https://${data.azurerm_kubernetes_cluster.aks.fqdn}"
  disable_iss_validation = "true"
}
OK.
Let’s take a small break.
We now have a working kubernetes cluster, an external vault cluster with kubernetes auth method enabled and mounted on aks/.
Prior to that, we enabled the Kvv2 secret engine and registered some secret(s) in it. We also prepped a policy for our test workload: the busybox.
If you have finished digesting all this information, we can go on and prepare the configuration for our busybox.
Below is the creation of namespace and service account for it. You could just do it in your yaml manifest actually, but since we want to setup vault role for the same workload, it’s convenient to do it all in terraform. And you know… fanboy ^^
resource "kubernetes_namespace_v1" "busybox" {
  metadata {
    name = "busybox"
  }
}

resource "kubernetes_service_account_v1" "busybox" {
  metadata {
    name = "busybox"
    namespace = "busybox"
  }
}
See. Stupid Simple!
And you will notice that we don’t need to manually create a service account token. As explained, the busybox will have its token automatically created and mounted in the projected volume.
The final step is to create the backend role:
resource "vault_kubernetes_auth_backend_role" "busybox" {
  backend                          = vault_auth_backend.kubernetes.path
  role_name                        = "busybox"
  bound_service_account_names      = [kubernetes_service_account_v1.busybox.metadata[0].name]
  bound_service_account_namespaces = [kubernetes_namespace_v1.busybox.metadata[0].name]
  token_ttl                        = 3600
  token_policies                   = ["default", "busybox"]
}
Just a quick review.
We have some interesting required attributes for this particular terraform resource:
bound_service_account_names
andbound_service_account_namespaces.
You also have to set a name and backend path, but what is interesting here, ist that, by design, the role forces you to bound a service account and a namespace. i.e. roles are natively scoped. And the final touch is the token_policies where your attach all the policies you want. We just add the busybox policy created at the begining, in addition to the default (because for this lab, I’m lazy and don’t want to copy all the token related permission required, I just attach the default policy).
5-d Inject a secret
We are getting there.
We’re done with all the heavy lifting. Now it’s just some basic kubernetes manifest and kubectl command to show our work (and then brag that we know how to use vault in kubernetes ^^)
Create a deployment file busybox.yaml to run your pod in the proper namespace, with the proper service account:
apiVersion: apps/v1
kind: Deployment
metadata:
  name: busybox-deployment
  namespace: busybox
  labels:
    app: busybox
spec:
  replicas: 1
  selector:
    matchLabels:
      app: busybox
  template:
    metadata:
      labels:
        app: busybox
      annotations:
        vault.hashicorp.com/agent-inject: 'true'
        vault.hashicorp.com/agent-inject-secret-devops_token: 'secret/devops'
        vault.hashicorp.com/agent-inject-template-devops_token: |token value stored on path secret/devops is vault.hashicorp.com/role: 'busybox'
        vault.hashicorp.com/log-level: 'debug'
    spec:
      containers:
      - name: busybox
        image: busybox
        imagePullPolicy: IfNotPresent

        command: ['sh', '-c', 'echo Container 1 is Running ; sleep 3600']
      serviceAccountName: busybox
the magic is in the annotations (see the comments):
      annotations:
      # We tell the the injector to inject the sidecar.
        vault.hashicorp.com/agent-inject: 'true'
      # We also tell it to retrieve a secret at `secret/devops` path and render it in a file named `devops_token`.
        vault.hashicorp.com/agent-inject-secret-devops_token: 'secret/devops'
      # then we write the template which state what the `devops_token` file will contain
        vault.hashicorp.com/agent-inject-template-devops_token: |token value stored on path secret/devops is # we specify the role to claim at authentication
        vault.hashicorp.com/role: 'busybox'
      # and since we're in a lab lots of logs won't hurt in case we messed up
        vault.hashicorp.com/log-level: 'debug'
Use kubectl to create the deployment with kubectl apply -f busybox.yaml.
Then nothing really happens, but have faith.
check your pods with kubectl get pods -n busybox, which should get you something similar to:
NAME                                  READY   STATUS        RESTARTS   AGE
busybox-deployment-6b858bbfd9-s6ghd   2/2     Running       0          68s
Let’s “enter” the container to see what was done kubectl exec --stdin --tty busybox-deployment-6b858bbfd9-s6ghd-n busybox -- /bin/sh. You see the folowing message:
Defaulted container "busybox" out of: busybox, vault-agent, vault-agent-init (init)
/
So thanks to the injector, an init container vault-agent-init was created to authenticate with Vault and retrieve the vault token, then the container vault-agent is started with the token from the init container, and it renders the secret file, then the main container busybox is started.
You can check the content of the rendered file, and voila!
/ cat /vault/secrets/devops_token
token value stored on path secret/devops is pat/
if you go back to 5-a, you can confirm the secret for secret/devops is indeed token=pat
6- Troubleshoot
Because sometimes there is a gap between my working lab and the blog (typo, new versions, etc), it’s always good to have some tools to help with trouble shooting.
I’ll give you some basic commands.
kubectl describe deploy busybox-deployment -n busyboxwill help you see what was deployed for your busyboxkubectl logs busybox-deployment-<your_pod_id> -c vault-agent-init -n busyboxis usefull to check authenticationkubectl logs busybox-deployment-<your_pod_id> -c vault-agent -n busyboxwill give you hints about what’s going on between the agent and the vault cluster. For example, if the policy is missing or insufficient, you will get the message here. Something like:
Code: 403. Errors:

* 1 error occurred:
	* permission denied
7- Conclusion
There you have it.
It was quite longer than I expected, but I think everything you need is there. I know it only fits a certain scenario, where you have an external cluster, but I believe this is best pattern.
Above all, I wanted to step out of all the documentation and tutorials, and enable you to understand better what the components are, and how they work together.
The really neat thing is that you can fetch secrets from vault, you don’t need to manage service account token, you just need a matching namespace and service account name in a role, and the projected sa token will be authenticated and authorized.
All of that while your app is perfectly unaware of vault.
This makes it a good solution if you’re deploying vault and want your kubernetes users to adopt the solution. They are just a few annotations away to get their secrets from vault. This becomes especially interesting when using dynamic secrets.
The downside however is the computing cost. You may already rely heavily on the sidecar pattern, this will add more compute stress to your cluster if you have a large amount of pods running.
As usual I hope you enjoyed it and learned something. Until next time. Cheers!