Traefik: getting started with docker

Table of Content
- Introduction
- Prerequisites
- Traefik
- Traefik with Docker
- SSL with Traefik
- Access your services
- Conclusion
1- Introduction
I recently decided to revisit local labs. The motivation was simple: it’s free compared to cloud hosted resources, which makes it more suitable for educational content. Also I happened to get myself without Internet connection (hello airplane!) which renders cloud hosted labs unusable. Finally, working on an ARM based macbook, VM is not really viable anymore. This particular topic still require Internet connectivity at some point, but not most of the time.
2- Prerequisites
Below is the list of requirements, followed by some explanations:
- docker-compose
- a Domain Name (with management delegated to Azure DNS)
- an Azure subscription with a public DNS zone for you domain
- a docker network named
traefik(you can use any name but you will need to amend the following config files accordingly)
In this blog post we will setup traefik for with docker compose, but we want to leverage traefik’s capability to generate Let’s Encrypt SSL certificates for backend services. This is one of the “magic” features of Traefik, it allows you to expose SSL services without the headache of manual certificate managemet (both issuance and renewal).
To do so I use Azure DNS to which I delegated the management of a public DNS Zone I own. Azure DNS is a supported provider for Traefik, but you can use many other providers, and benefit from its DNS challenge workflow to manage SSL certificates. The list of available DNS providers can be found here. You can also use http challenge, but that will require you to expose a service to the Internet.
Since we are going to use Azure DNS for our public domain, we’ll need to provide Traefik some credentials to perform DNS challenge. If you’re not familiar, one of the way Let’s Encrypt CA can verify you own the domain you’re requesting a certificate for. It essentially relies on verifying that a TXT record generated at the request is created in the domain zone by its owner, hence proving the user is indeed the owner. Since we are working from a regular workstation, we will use basic Entra ID service principal and assign it a role.
# Create SP with permissions on you Azure DNS Zone:
az ad sp create-for-rbac --display-name <your_sp_name> --role "DNS Zone Contributor" --scopes "<your_azure_dns_zone_id>"
In the above snippet, you can replace <your_sp_name> by whatever name you want to use for your service principal, th role DNS Zone Contributor is a built-in role with enough permissions to manage your DNS records, and finally, the scope "<your_azure_dns_zone_id>" must be replaced by your Azure DNS Zone id. You can retrieve this id with an Az CLI command like az network dns zone show --zone-name example.com -g my-rg --query "id".
This will output you something like this:
{
  "appId": "aaaa114c-d001-4486-888a-16d4ad5695f2",
  "displayName": "sp-test",
  "password": "mLp8sfiohoi...",
  "tenant": "xxxxxxxx-xxxx-xxxx-xxxx-xxxxxxxxxxxx"
}
Store safely the password and appId as you will need to be able to provide them to Traefik at startup.
To create the docker network, a single command will do it for you: docker network create traefik.
3- Traefik
Now, let’s take a step back and introduce Traefik, or rather Traefik Proxy I should say. Traefik Labs is developping multiple product around what we can call “ingress” management, in the broad sense of the term (not specifically Ingress as in Kubernetes). Traefik proxy is open source and is what we will use here, but Traefik Labs also has Traefik Hub (API Gateway/Management) and Traefik Enterprise, in its portfolio. Traefik Proxy is free, but depending on your needs, other version should be used. Some will of course induce additional costs. But as with anything in the OSS world, I strongly encourage to assess your need and use the more refined paid versions if this is what fits your needs. Paying for the full product when your business or your client benefits from it is the best way to support this open source ecosystem, so that we can still use awesome products for free for personal or small businesses use cases.
Here we will use Traefik locally with Docker, but you can use it as an Ingress Controller alternative if you’re a Kubernetes user. There is also a very great integration with HashiCorp’s scheduler: Nomad.
4- Run Traefik locally with Docker
We want to use Traefik to expose our services running in our docker host. The purpose here is to easiily spin-up services on a local machine, while still having SSL and mock a real world infrastructure where your service is hosted behind some kind of load balancer.
So first, ensure that you have the requirements on your machine, as indicated in the # 2- Prerequisites section. You will then have to setup multiple files:
- docker-compose.yaml file: to setup docker to pull Traefik image and start it
- traefik.yml file: to setup Traefik’s behaviour, like entrypoints, certificate resolvers, logging, api settings, etc.
4.1- Prepare Docker folder structure
Because you will need to persist data and will later want to add services to be routed by Traefik, I suggest your create a docker folder in which you will create a traefik subdolder where you will put everything related to Traefik. Then any other service to be routed/load balanced by Traefik should have its own folder under the docker folder. Example:
docker
├── traefik
│   ├── acme.json
│   ├── certs
│   ├── config
│   │   └── traefik.yml
│   ├── docker-compose.yaml
│   └── log
│       └── traefik.log
│
├── serviceA
│   ├── docker-compose.yaml
└── serviceB
    └── docker-compose.yaml
In the example above, the traefik folder contains every file related to traefik docker instance, either docker related config or traefik related config. Using the same logic, you can see 2 other subfolders example, named serviceA and serviceB, where you’d store config related to these 2 hypothetical services.
4.2- Docker Compose configuration
Now that we’ve cleared the basic suggested folder organization, let’s jump into docker configuration. As said before, we use docker compose to facilitate configuration.
Here is the docker-compose.yaml for our little project:
services:
  traefik:
    # The official v3 Traefik docker image
    image: traefik:v3.1
    container_name: traefik
    restart: unless-stopped
    networks:
      - traefik
    ports:
      # The HTTP port
      - "80:80"
      # The Web UI (enabled by --api.insecure=true)
      #- "8080:8080"
      # The HTTPS port
      - "443:443"
    environment:
      - AZURE_AUTH_METHOD=env
      - AZURE_TENANT_ID=${AZURE_TENANT_ID}
      - AZURE_CLIENT_ID=${AZURE_CLIENT_ID}
      - AZURE_CLIENT_SECRET=${AZURE_CLIENT_SECRET}
      - AZURE_SUBSCRIPTION_ID=${AZURE_SUBSCRIPTION_ID}
      - AZURE_RESOURCE_GROUP=${AZURE_RESOURCE_GROUP}
      - AZURE_ZONE_NAME=${AZURE_ZONE_NAME}
    volumes:
      - /var/run/docker.sock:/var/run/docker.sock
      - ./config/traefik.yaml:/etc/traefik/traefik.yaml:ro
      - ./log:/log
      - ./acme.json:/acme.json
    labels:
      - "traefik.enable=true"
      # Router for http
      - "traefik.http.routers.traefik_http.entrypoints=http"
      - "traefik.http.routers.traefik_http.rule=Host(`traefik-dash.docker.example.com`)"
      # Router for https
      - "traefik.http.routers.traefik_https.entrypoints=https"
      - "traefik.http.routers.traefik_https.rule=Host(`traefik-dash.docker.example.com`)"
      - "traefik.http.routers.traefik_https.tls=true"
      - "traefik.http.routers.traefik_https.tls.certresolver=azure"
      - "traefik.http.routers.traefik_https.tls.domains[0].main=traefik-dash.docker.example.com"
      - "traefik.http.routers.traefik_https.service=api@internal"

networks:
  traefik:
    external: true
Let’s dive into the settings here:
services:
  traefik:
    # The official v3 Traefik docker image
    image: traefik:v3.1
    container_name: traefik
    restart: unless-stopped
    networks:
      - traefik
(...)
First we declare a service named traefik, which will actually the only service managed by this compose file. As usual, we specify the image and version to pull and give the container a name with the container_name attribute. You will notice the networks section where we specify the traefik docker network that was created beforehand (refer to 2- Prerequisites section).
Then in the ports section we commented out the 8080 which is the insecure port for the dashboard when not using TLS. We kept the port 80 but as you will see below, we use some Traefik label to redirect to https.
(...)
    ports:
      # The HTTP port
      - "80:80"
      # The Web UI (enabled by --api.insecure=true)
      #- "8080:8080"
      # The HTTPS port
      - "443:443"
 (...)
In the environment section you can observe all variables prefixedAZURE_:
(...)
    environment:
      - AZURE_AUTH_METHOD=env
      - AZURE_TENANT_ID=${AZURE_TENANT_ID}
      - AZURE_CLIENT_ID=${AZURE_CLIENT_ID}
      - AZURE_CLIENT_SECRET=${AZURE_CLIENT_SECRET}
      - AZURE_SUBSCRIPTION_ID=${AZURE_SUBSCRIPTION_ID}
      - AZURE_RESOURCE_GROUP=${AZURE_RESOURCE_GROUP}
      - AZURE_ZONE_NAME=${AZURE_ZONE_NAME}
(...)
These are used by the DNS provider for the certificate generation.
The first AZURE_AUTH_METHOD is set to env which means that we will provide the settings for the azure DNS provider using environment variables.
Back to the 2- Prerequisites section, we created a service principal which resulted in an appId and password to inject respectively to AZURE_CLIENT_ID and AZURE_CLIENT_SECRET.
Finally, the other four variable names speak for themselves, you have to provide your tenant/directory id, the subscription id, resource group name for your DNS zone and the name of the zone itself. Pretty straightforward.
In the volumes section we will find some interesting mount points:
(...)
    volumes:
      - /var/run/docker.sock:/var/run/docker.sock
      - ./config/traefik.yaml:/etc/traefik/traefik.yaml:ro
      - ./log:/log
      - ./acme.json:/acme.json
(...)
First the usual docker socket required to access the docker API. I know, I know, this is unsecure, but don’t be too hung up on this, I should remind you we’re building a local testing/lab environment. :)
To be fair, Traefik Labs team provide some alternatives for more secure approach as the shortcomings of exposing docker socket are pretty well documented.
Next we mount the traefik.yaml file. As you can see I store it into a config folder. This is not necessary, but considering additional configurations can/should be added with additional yaml files, rather than having a messy traefik folder I decided to create a subfolder specifically for config files. traefik.yaml will be further explained in #4.3
Then the log directory is here for that: logs. This comes in handy to have somewhere to look for your Traefik logs if you ever need troubleshooting.
Last is acme.json which is where Traefik will store the certificates and keys. You can just mount an empty file and it will populate it as it generates certificates for your services.
The labels section is the penultimate configuration to review from the compose file, and it’s actually where the magic happens.
These particular labels on Traefik service itself are only required to expose securely the dashboard.
(...)
labels:
      - "traefik.enable=true"
      # Router for http
      - "traefik.http.routers.traefik_http.entrypoints=http"
      - "traefik.http.routers.traefik_http.rule=Host(`traefik-dash.docker.example.com`)"
      # Router for https
      - "traefik.http.routers.traefik_https.entrypoints=https"
      - "traefik.http.routers.traefik_https.rule=Host(`traefik-dash.docker.example.com`)"
      - "traefik.http.routers.traefik_https.tls=true"
      - "traefik.http.routers.traefik_https.tls.certresolver=azure"
      - "traefik.http.routers.traefik_https.tls.domains[0].main=traefik-dash.docker.example.com"
      - "traefik.http.routers.traefik_https.service=api@internal"
(...)
I have inserted some meaningful comments to help remembering what does what. The first argument clearly states to enable traefik.
Then we setup an http router named traefik_http, and we setup its entrypoint to http. Entrypoints are setup in traefik.yaml (see #4.3).
We also configure a global http to https redirection in the config file. Next label is used to set the matching host for the dashboard, with the fqdn we’ll be requesting to access the dashboard.
The final part is the settings for the https router.
As for http, we set the entrypoint to the corresponding port configured in traefik.yaml, we set the same matching host as for http, then enable TLS. Because we enabled TLS we want to let Traefik andle the certificates for us and this is where we tell it to use a resolver named azure (again, we’ll get to see the related configuration in traefik.yaml). The domain label basically tells Traefik the name we want in our certificate (note: there is an option for SANS). The api@internal service is the dashboard and API access.
Below is our latest section.
(...)
networks:
  traefik:
    external: true
This tells docker that the network named traefik is external to this configration (i.e. we created it beforehand).
4.3- Traefik Proxy traefik.yaml (or .toml) configuration file
So Traefik can be configured either with CLI (i.e. use command section in docker-compose.yaml) or using configuration file. As we’ve seen before we mount this file to the container so that Traefik can actually read the configuration. Actually you can eith use yaml or toml syntax. I personally went the yaml road as everything seems to be yaml in the devops world and I already have to deal with that on a daily basis. But if you prefer toml, to each his own. ¯_(ツ)_/¯
In our case there’s not that much to setup, but still some pretty important things.
Here’s the file we’ll use:
################################################################
# Global configuration
################################################################
global:
  checkNewVersion: true
  sendAnonymousUsage: false

################################################################
# EntryPoints configuration
################################################################

entryPoints:
  http:
    address: :80
    http:
      redirections:
        entrypoint:
          to: https
          scheme: https

  https:
    address: :443

certificatesResolvers:
  azure:
    acme:
      email: me@example.com
      storage: acme.json
      dnsChallenge:
        provider: azuredns
        delayBeforeCheck: 0
        resolvers:
        - "1.1.1.1:53"
        - "8.8.8.8:53"

################################################################
# Traefik logs configuration
################################################################

log:
  level: DEBUG
  filePath: log/traefik.log

################################################################
# API and dashboard configuration
################################################################

api:
  dashboard: true

################################################################
# Docker configuration backend
################################################################

providers:
  # Enable Docker configuration backend
  docker:
    exposedByDefault: false
As you can see, there are a few sections with simple settings. You can find example files in the github repository of the project if I’m not mistaken. Here is a quick break down:
################################################################
# Global configuration
################################################################
global:
  checkNewVersion: true
  sendAnonymousUsage: false
(...)
Some simple options pretty straightforwad. We continuously check for new version and we don’t share data about usage (since it’s for lab, we actually could, just be sure you’re ok with what is collected).
################################################################
# EntryPoints configuration
################################################################

entryPoints:
  http:
    address: :80
    http:
      redirections:
        entrypoint:
          to: https
          scheme: https

  https:
    address: :443
Now we set our entrypoints (we’ll start with standard http and https) and as stated before, we setup a global redirection from http to https. That way, any service for which we setup both http and https router will redirect traffic to https entrypoint.
certificatesResolvers:
  azure:
    acme:
      email: me@example.com
      storage: acme.json
      dnsChallenge:
        provider: azuredns
        delayBeforeCheck: 0
        resolvers:
        - "1.1.1.1:53"
        - "8.8.8.8:53"
Certificates resolver config is where we can setup the provider for the acme DNS challenge. Here we use the azuredns provider, specify the acme.json file as storage and resolvers ip addresses.
################################################################
# Traefik logs configuration
################################################################

log:
  level: DEBUG
  filePath: log/traefik.log

################################################################
# API and dashboard configuration
################################################################

api:
  dashboard: true
log and api config don’t need much comment from me.
################################################################
# Docker configuration backend
################################################################

providers:
  # Enable Docker configuration backend
  docker:
    exposedByDefault: false
Lastly we enable docker provider for to allow Traefik to dynamically configure routers based on the labels in attached to a container. This is pure sorcery! Once this is setup, Traefik will pickup the labels for any new container and create the corresponding router configuration for it, generate LE certificate for it if required, associate middleware, etc.
5- Secure and expose an http server with Traefik
With all that config out of the way, we are ready to add services to our Docker lab and expose them using Traefik. To showcase this, we can follow the project’s own Docker quick start guide with the whoami service.
Let’s go back to our docker folder and create a whoami subfolder containing the following docker-compose.yaml file:
services:
  whoami:
    image: "traefik/whoami"
    networks:
      - traefik
    labels:
      - "traefik.enable=true"
      - "traefik.http.routers.whoamissl.rule=Host(`whoami.docker.example.com`)"
      - "traefik.http.routers.whoamissl.entrypoints=https"
      - "traefik.http.routers.whoamissl.tls=true"
      - "traefik.http.routers.whoamissl.tls.certresolver=azure"
      - "traefik.http.routers.whoamissl.tls.domains[0].main=whoami.docker.example.com"

networks:
  traefik:
    external: true
The config is super simple, we just pull the image, specify to use traefik network, and assign some labels.
Traefik will do its magic thanks to the docker provider we enabled before. It will pickup the labels and act accordingly. We specify the host matching rule, the https entrypoing, the tls resolver and domain to generate Let’s Encrypt certificate on the fly and voila!
You can now try to scale the service and verify that Traefik is handling the request and loadbalancing them.
# From the whoami folder execute the following command
docker-compose up -d --scale whoami=3
Docker will spin-up 3 instances of the whoami service, as your terminal will output something like:
[+] Running 3/3
 ✔ Container whoami-whoami-1  Started                                                                                                                 1.2s
 ✔ Container whoami-whoami-2  Started                                                                                                                 4.0s
 ✔ Container whoami-whoami-3  Started
6- Access your services
Now how to access all our nice services?
The quick and easy way is to use your hosts file. Head to your terminal and edit /etc/hosts file (you’ll need sudo permissions).
For every service you will host, add an alias in front of your 127.0.0.1 entry, like so:
##
# Host Database
#
# localhost is used to configure the loopback interface
# when the system is booting.  Do not change this entry.
##
127.0.0.1	localhost
255.255.255.255	broadcasthost
::1             localhost

127.0.0.1			traefik-dash.docker.example.com
127.0.0.1			whoami.docker.example.com
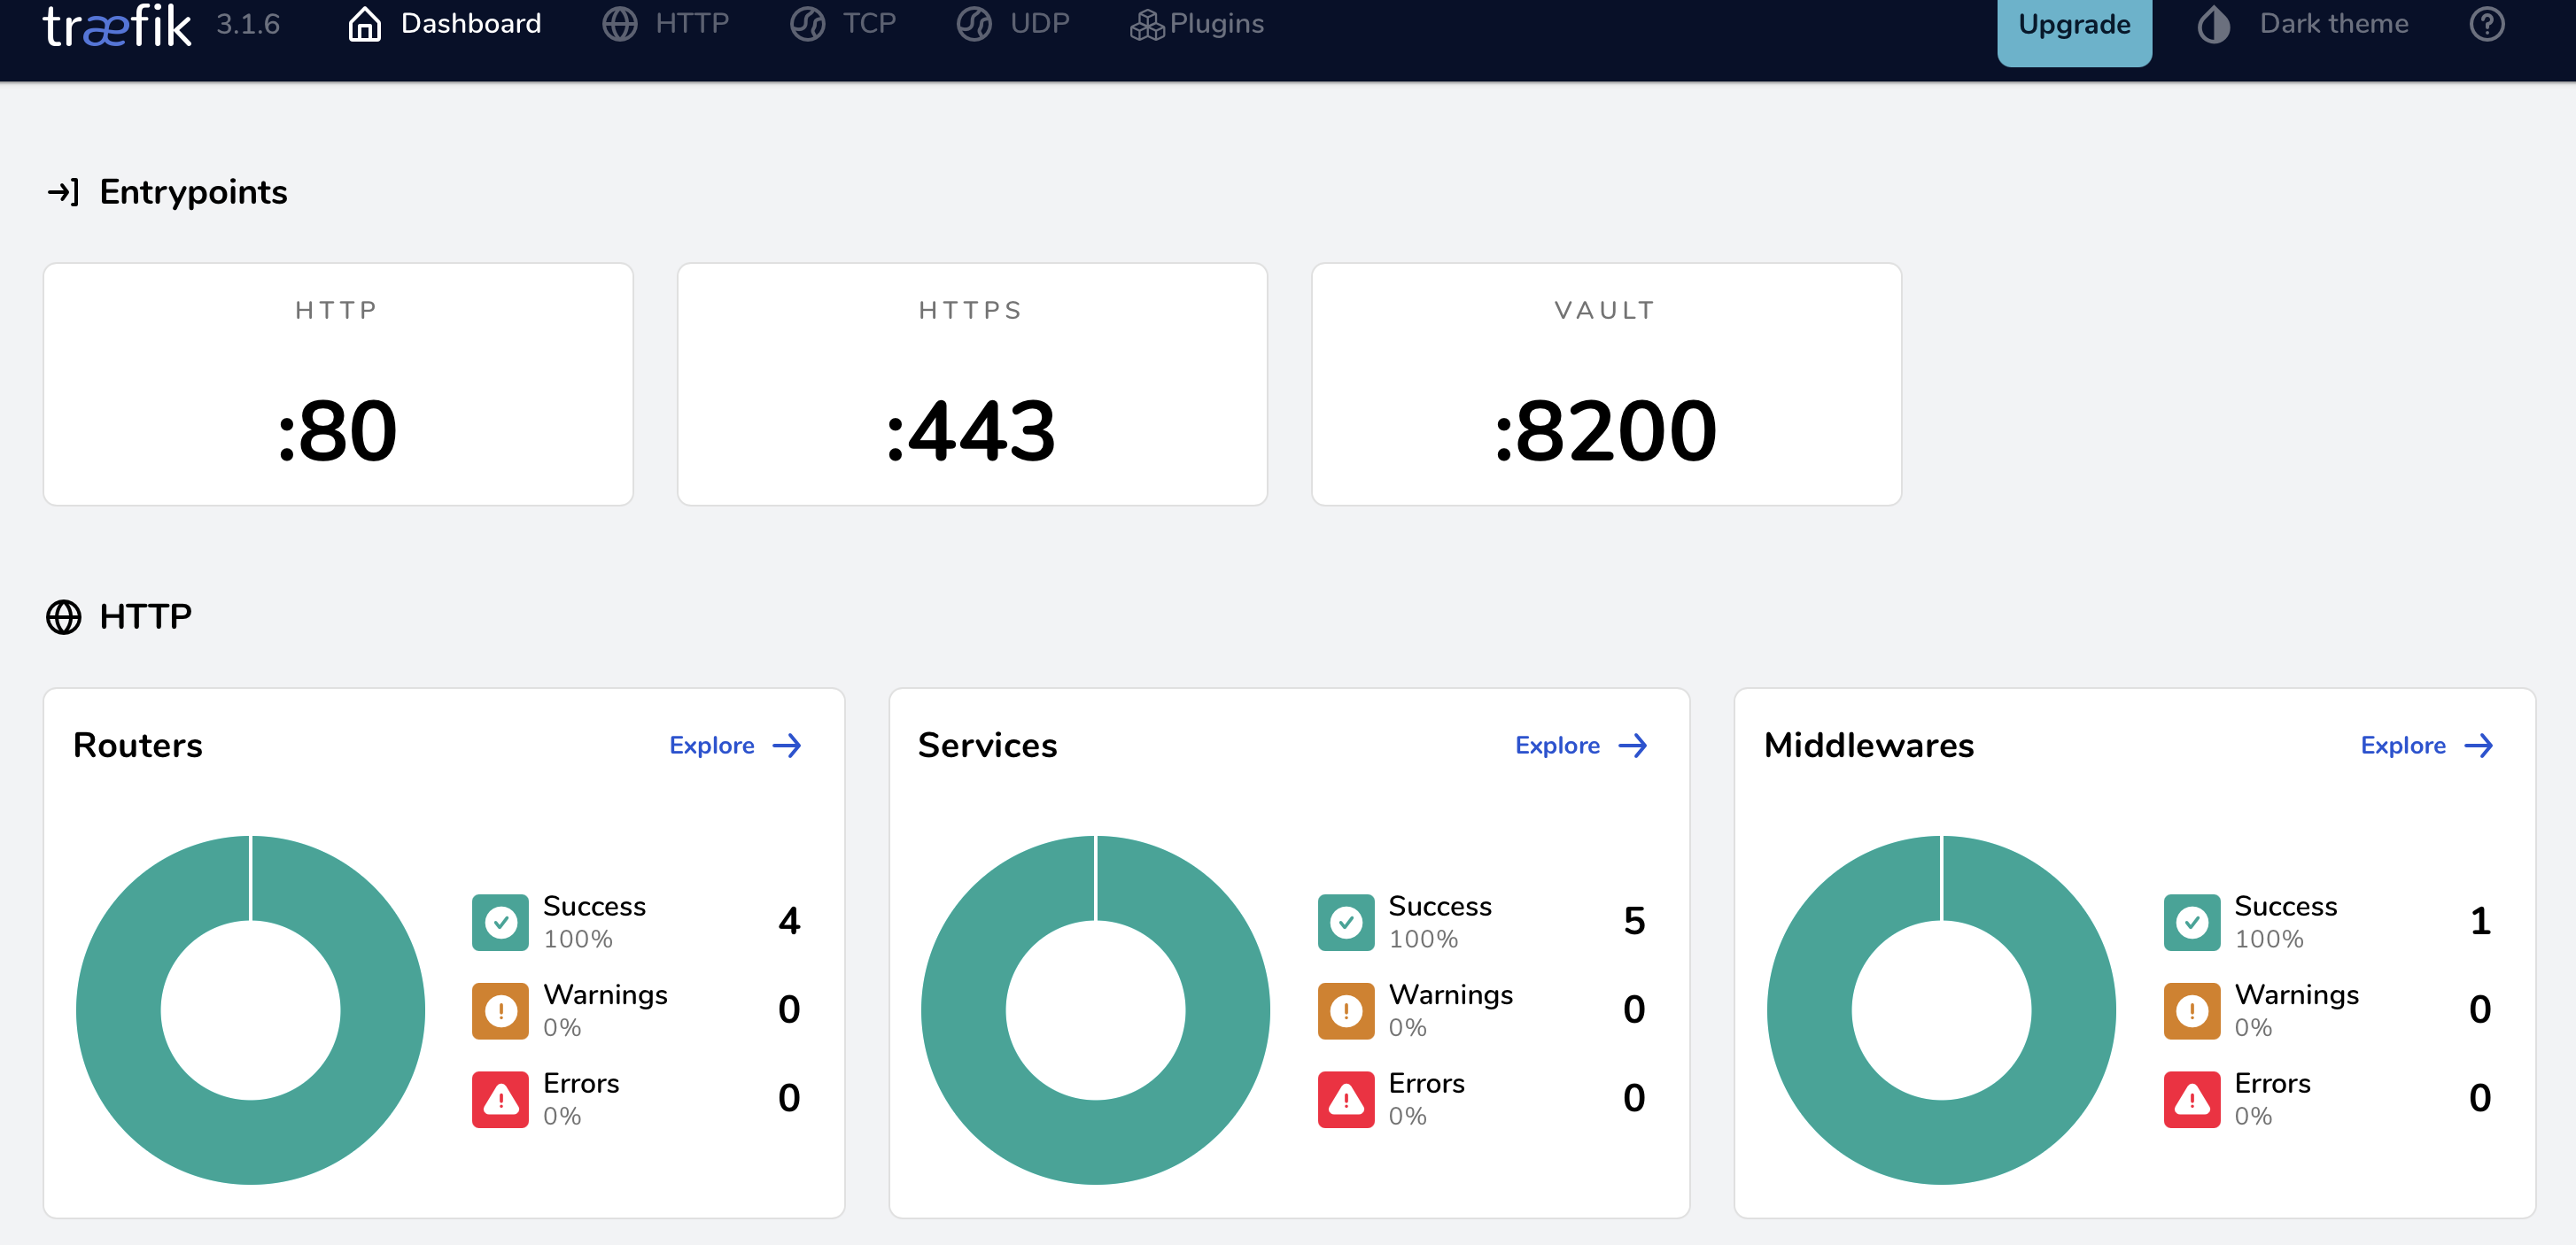
If you want to see your dashboard head to https://traefik-dash.docker.example.com and you will see something like this:
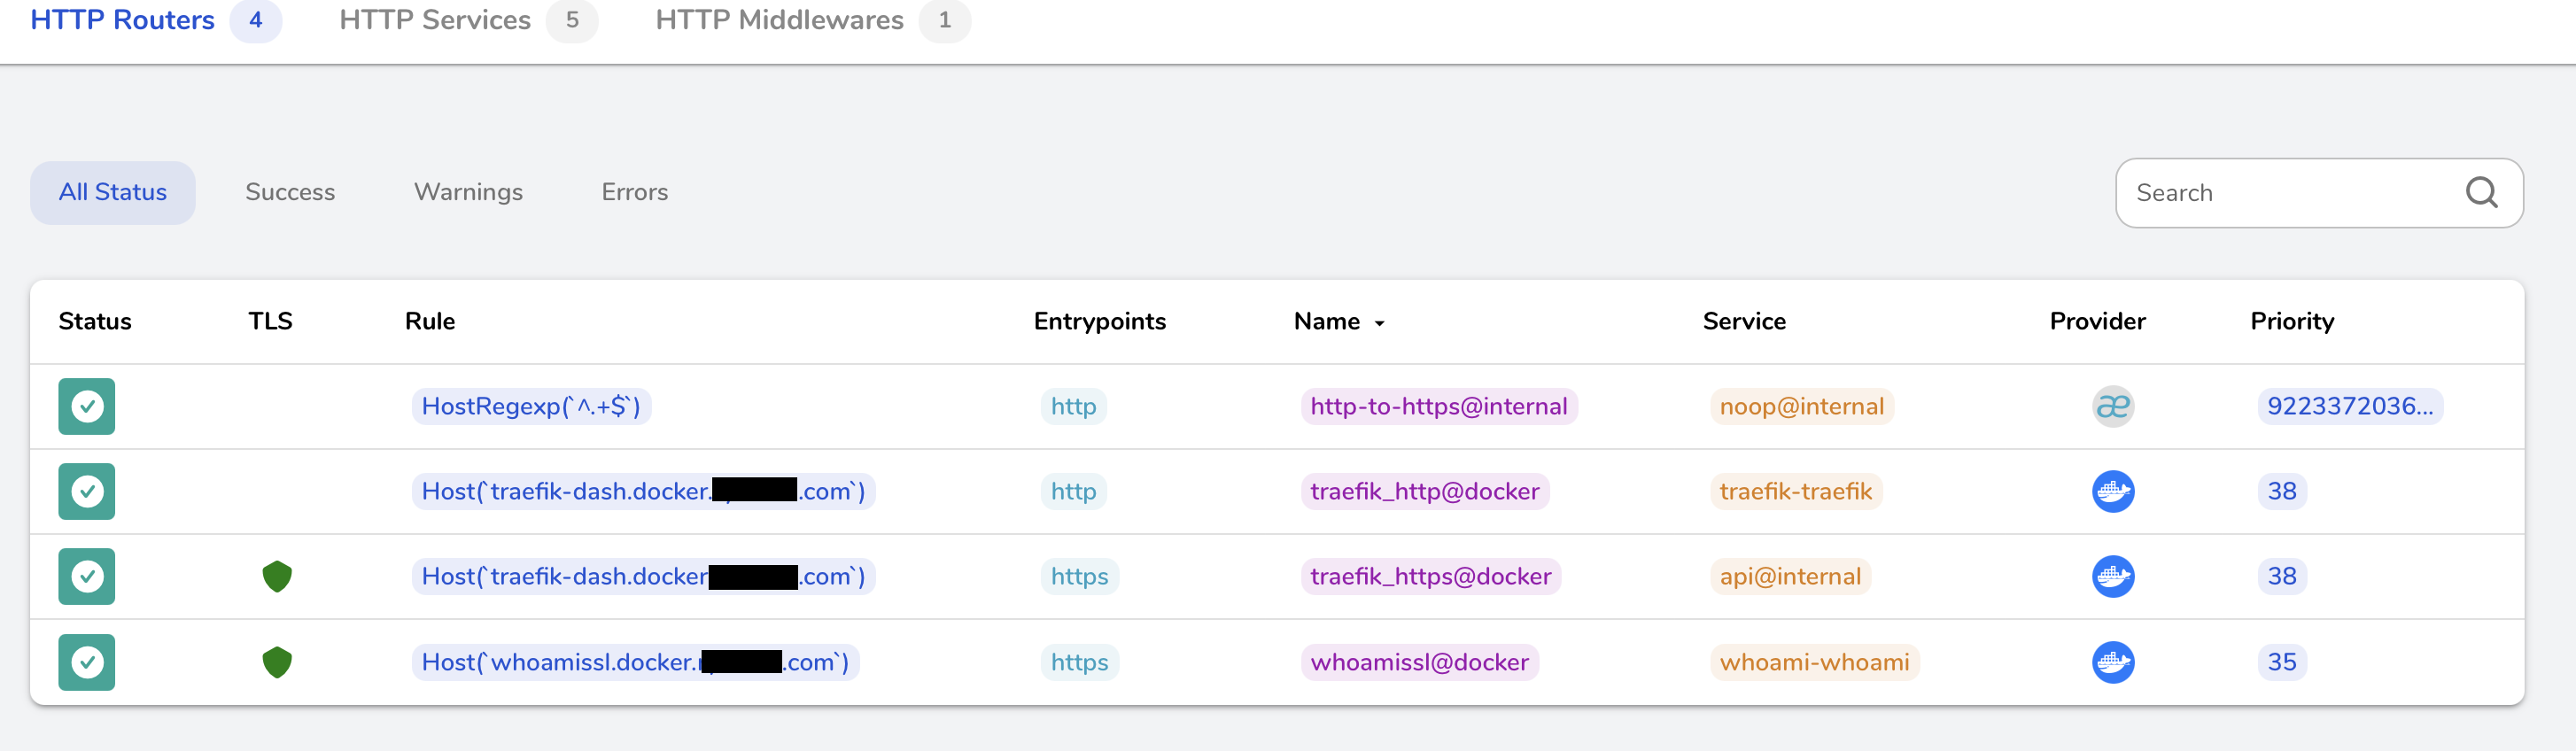
Looking at your http routers you should see the one you setup for traefik dashboard but also for whoami:
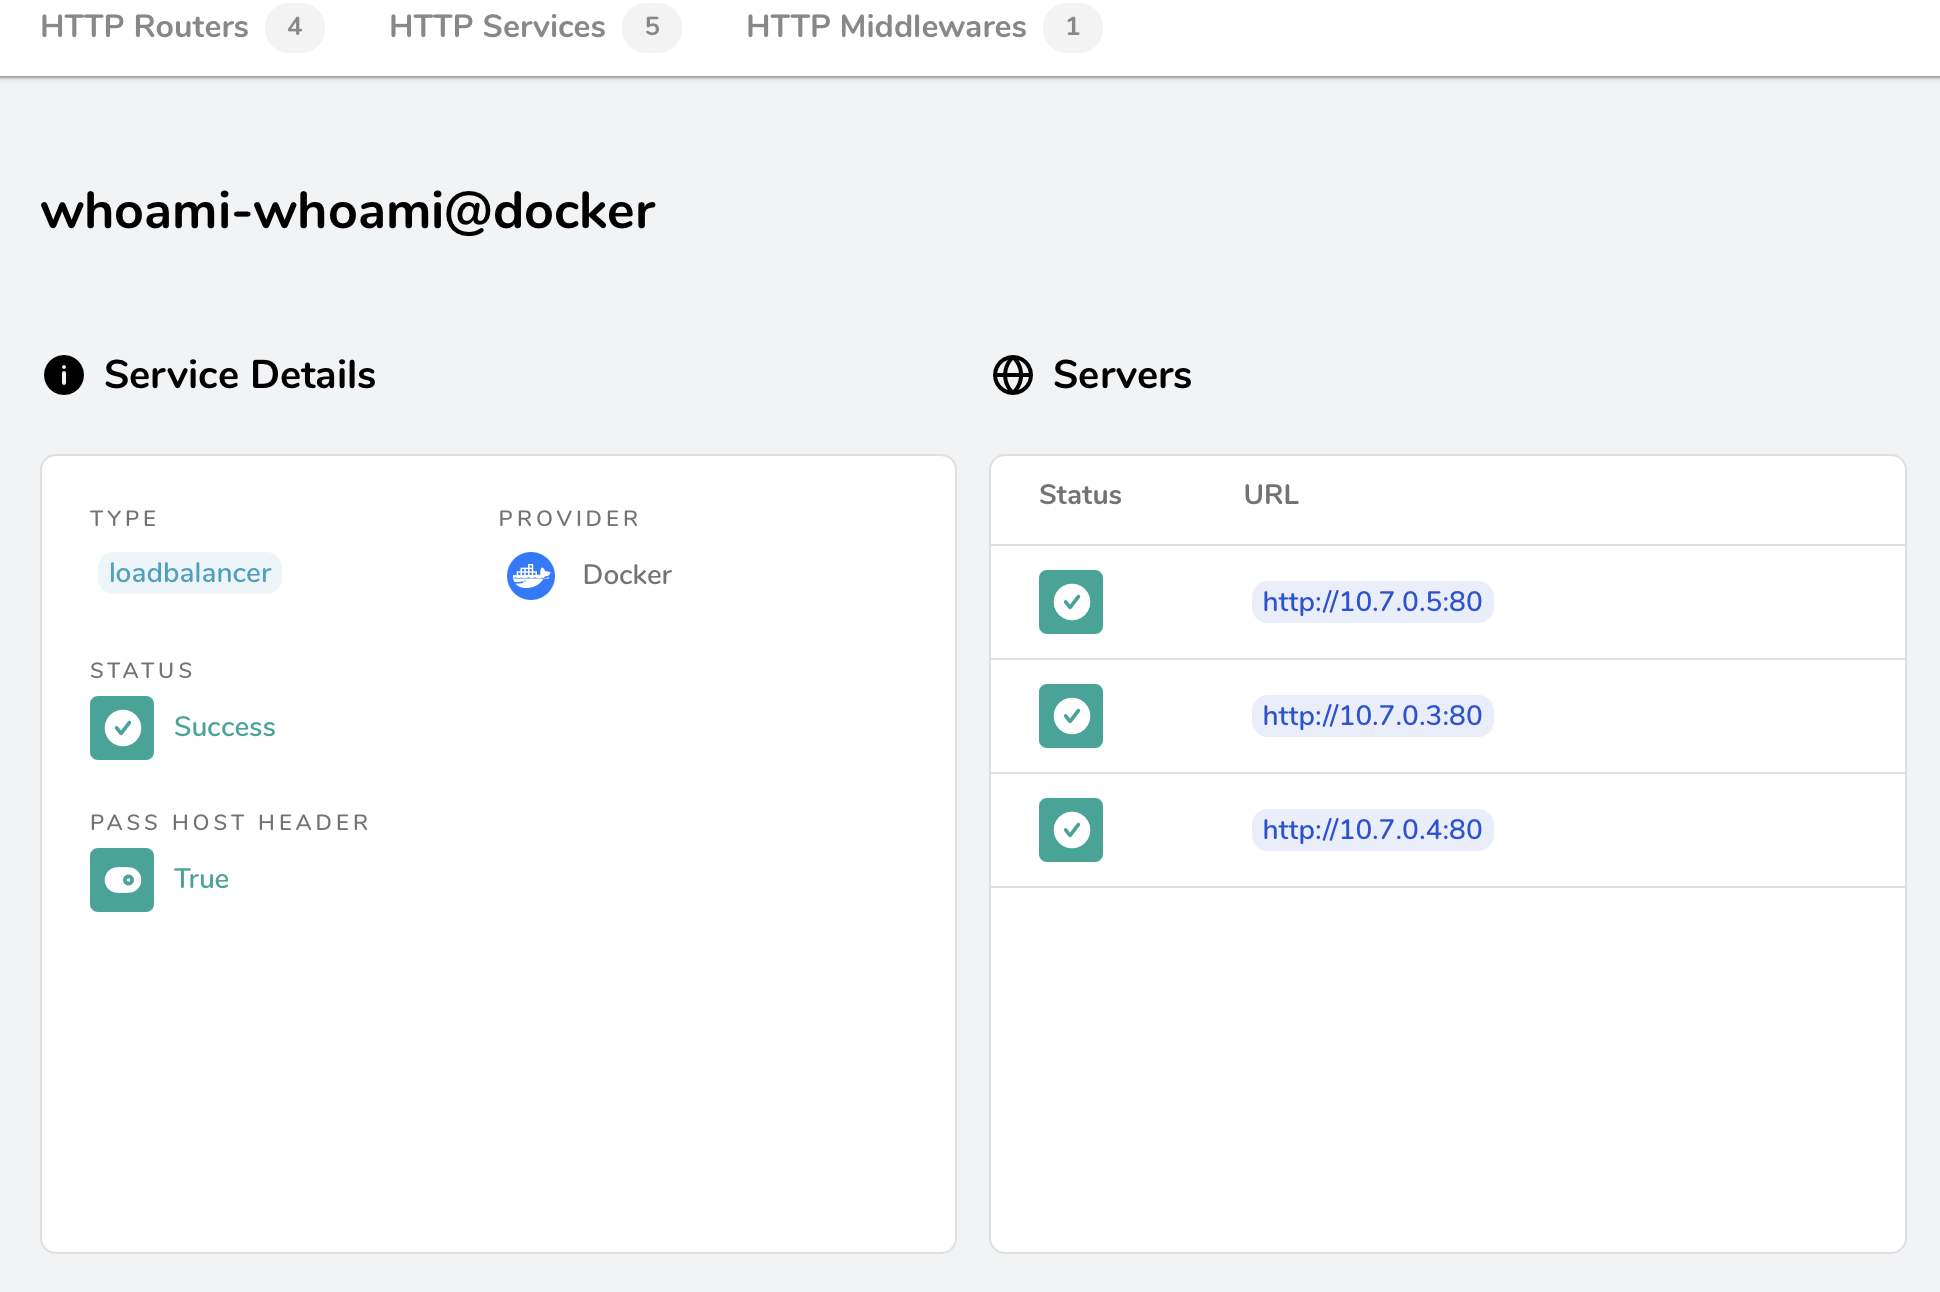
If you click on the whoami router you will recognize some parameters that were set by the labels in the docker compose and picked up by Traefik to automatically configure the router:

Lastly. the whoami service will show you your 3 instances:
All this is great but does Traefik really loadbalances ingress connections?
Let’s find out with good old curl command: curl https://whoami.docker.example.com
You will observe results like this:
 nate@localhost$ curl https://whoami.docker.example.com
Hostname: 57d9fb07ce79
IP: 127.0.0.1
IP: ::1
IP: 10.7.0.5 # !!! NOTICE THE IP CHANGING !!!
RemoteAddr: 10.7.0.2:45268
GET / HTTP/1.1
Host: whoami.docker.example.com
User-Agent: curl/8.7.1
Accept: */*
Accept-Encoding: gzip
X-Forwarded-For: 10.7.0.1
X-Forwarded-Host: whoami.docker.example.com
X-Forwarded-Port: 443
X-Forwarded-Proto: https
X-Forwarded-Server: 025d50f96593
X-Real-Ip: 10.7.0.1

 nate@localhost$ curl https://whoami.docker.example.com
Hostname: cf0f7c3272b0
IP: 127.0.0.1
IP: ::1
IP: 10.7.0.4 # !!! NOTICE THE IP CHANGING !!!
RemoteAddr: 10.7.0.2:59338
GET / HTTP/1.1
Host: whoami.docker.example.com
User-Agent: curl/8.7.1
Accept: */*
Accept-Encoding: gzip
X-Forwarded-For: 10.7.0.1
X-Forwarded-Host: whoami.docker.example.com
X-Forwarded-Port: 443
X-Forwarded-Proto: https
X-Forwarded-Server: 025d50f96593
X-Real-Ip: 10.7.0.1

 nate@localhost$ curl https://whoami.docker.example.com
Hostname: 9e03e4053e00
IP: 127.0.0.1
IP: ::1
IP: 10.7.0.3 # !!! NOTICE THE IP CHANGING !!!
RemoteAddr: 10.7.0.2:37584
GET / HTTP/1.1
Host: whoami.docker.example.com
User-Agent: curl/8.7.1
Accept: */*
Accept-Encoding: gzip
X-Forwarded-For: 10.7.0.1
X-Forwarded-Host: whoami.docker.example.com
X-Forwarded-Port: 443
X-Forwarded-Proto: https
X-Forwarded-Server: 025d50f96593
X-Real-Ip: 10.7.0.1
We get answers from different instances as expected.
7- Conclusion
We have setup a docker network and Traefik container to handle loadbalancing and certificates lifecycles for any new service we’d want to run in our docker environment. We get to play with everything using TLS certificates, accessing services using FQDN. Thanks to Traefik and docker provisioner, we only have to add a few labels to any new service we want to add and Traefik will handle everything automatically for us. It’s almost a set it and forget it configuration. It is so pleasant to use once properly setup. I can only recommand diving deeper into the product and if satisfied with local docker testing, why not take the leep of faith and try using it in kubernetes environment for a reacher and more robust integration?
See you next time!